
Alert Groups and Users
This feature allows you to add the user who you want to send monitoring alerts. You can add multiple users and then group these users into a user group. To send alerts to different teams or groups, you can create and manage multiple user groups. A user group can have one or more users.
Adding a New User
To add a user:
- On the vMonitor dashboard, click the Alert Groups and Users tab.

- On the vMonitor dashboard, click User Master, and the Users page opens.

Note:- The User Master module maintains the user’s details.
- On the Users page, click Add Users, and the Add User dialog box opens.
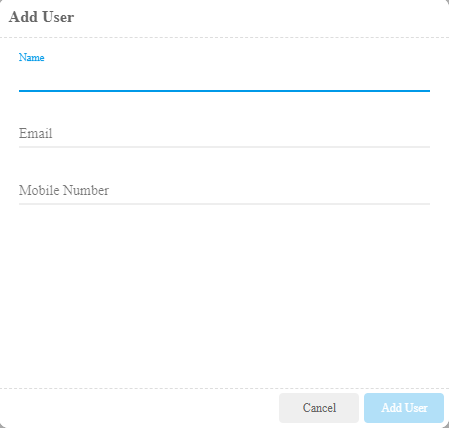
- In the Add User dialog box, enter the following details:
| Field | Description |
| Name | In this box, enter the user’s name (For example:- Rishi). |
| In this box, enter the user’s email ID (For example:- rishi.mishra@decimal.co.in). This email is treated as the registered email ID. The vMonitor module sends monitoring alerts to the registered email ID that you enter in the Email field. | |
| Mobile Number | In this field, enter the user’s mobile number (For example:- 89XXXXXX58). |
- After you enter the user’s details, click Add User to add the new user’s profile.
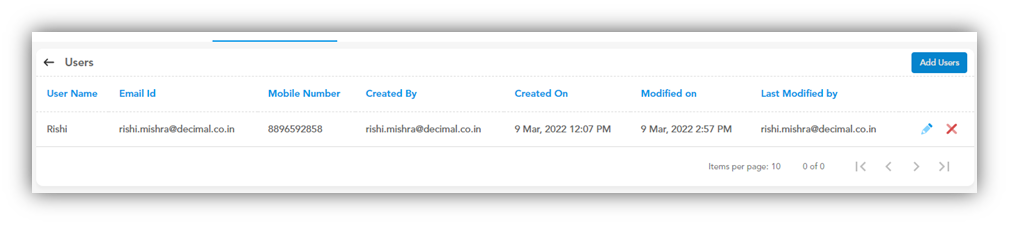
After you successfully add the user’s profile, the Users page displays the new user’s details:
Editing User’s Details
This feature allows you to edit the user’s details. To edit the user’s details:
- On the vMonitor dashboard, click the Alert Groups and Users tab.
- Click User Master, and the dashboard displays the user’s details.

- In the list, find the user.
or
- In the Search box, enter the user name and then find it.
- After you find the user, move to the right and then click the edit icon (
 ), and the Edit User dialog box opens.
 - In the Edit User dialog box, you can modify the following user’s details:
- Name
- Mobile Number
- After you edit the user’s details, click Update User to successfully edit the user.
Deleting a User
To delete a user:
- On the vMonitor dashboard, click the Alert Groups and Users tab.
- Click User Master, and the dashboard displays the user’s details.
- In the list, find the user.
or
- In the Search box, enter the user name and then find it.
- After you find the user, move to the right and then click the Delete icon (
 ), a message box opens and then displays the message: “This will permanently delete this user. Are you sure you want to delete this?“
 - If you want to delete the user, click OK in the message box to delete it.
User Group
The “Alert Groups and Users” feature also allows you to create or add a group if you want to send monitoring alerts to multiple users periodically. After you create a group, you can add one or more users to the newly created group.
To add a new group:
- On the vMonitor dashboard, click the Alerts Groups and Users tab.

- Click Create Group, and the Create Group dialog box opens.
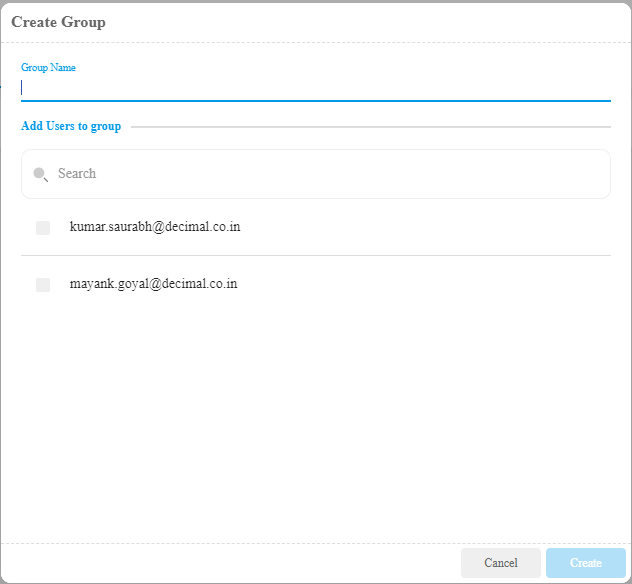
- In the Create Group dialog box, in the Group Name field, enter the group’s name (For example:- Test).
- Under Add Users to group, see the user’s email ID to find the user.
or
- Under Add Users to group, in the Search box, enter the user’s email ID to find the user.
- After you find the user, click the related check box to add the user.
- Repeat the step 6 to select other users.
- After you select all users, click Create to successfully create a group.
After you successfully create a group, the vMonitor dashboard displays the newly created group with its details.

Managing a User Group
This feature allows you to edit a group’s details. To edit a user group:
- On the vMonitor dashboard, click the Alerts Groups and Users tab, and the vMonitor dashboard displays the list of available user groups.
- In the list, find the group.
or
- In the Search box, enter the group name and then find it.
- After you find the group, move to the right and then click the forward arrow icon (
 ), and the vMonitor dashboard displays the list of users added to the current group.
 - After you see the list of added users to the group, you can perform the following functions:
- Click Delete to delete the current group.
- Click Add User to Group to add more users to the current group (See the User Group section).
- Click the Edit icon () to edit the user’s details. (See the Editing User’s Details section).
- Click the Delete icon () to delete the user (See the Deleting a User section)