
Adding Capture Image Element
This section describes how to add Capture Image control on the form. After you add Capture Image control, you can configure this element to capture the image from your mobile device.
To add the image element:
- On the left navigation pane, click Standard, and the Standard menu expands.
- Under Standard, scroll down and then locate the Capture Image element.
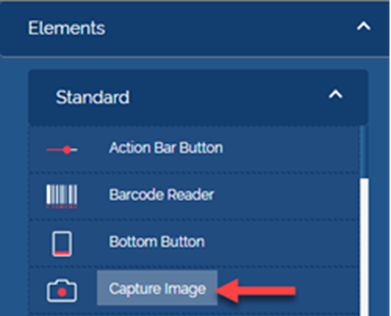
- Click the Capture Image element, and the Image dialog box opens.
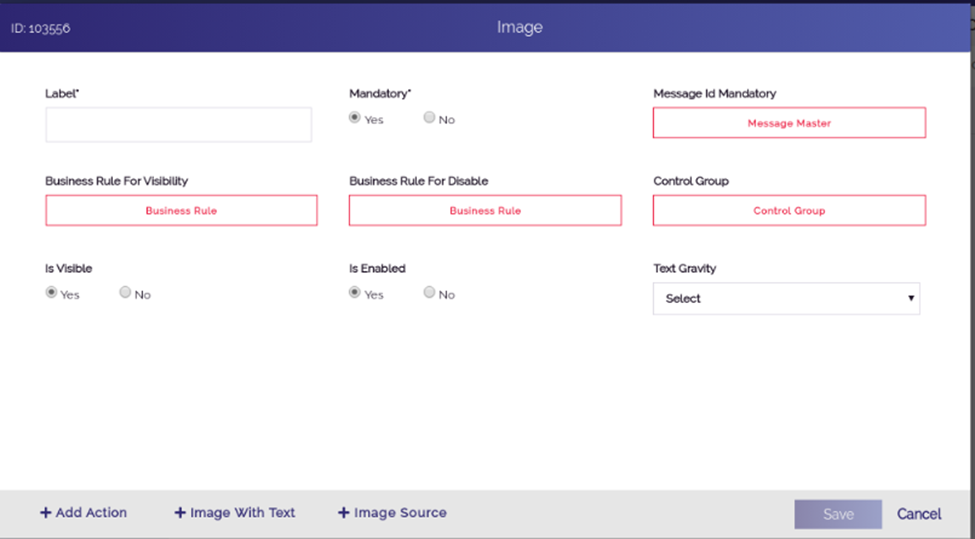
- In the Image dialog box, perform the functions as follows:
| Box | Description |
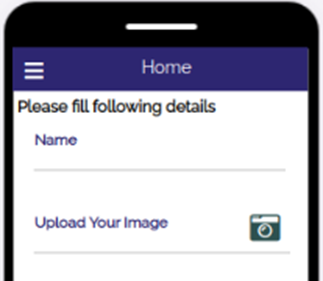
| Label | In this box, enter the label name or title of the image (For example: – Upload Your Image). |
| Mandatory | Click Yes if you want to make the capture image function as a mandatory activity. |
| Message Id Mandatory | This feature is used to configure the message if the user forgets to perform the action on the element. To configure a new message: 1. Click Message Master, and the Message Master dialog box opens. 2. In the Message Master dialog box, click the Message Type list and then select “I” to add information type message. 3. After you select the message type, click the Description box. 4. In the Description box, enter the text of message (For example: – Please upload your image.) 5. After you enter the text/description of the message, click Add Message, the message is successfully configured. |
- After you perform these functions on the Image dialog box, click Image Source, and the Image Definition Form dialog box opens.
- In the Image Definition Form dialog box, enter values in the boxes as follows:
| Box | Description |
| Absolute JSON Path | In this box, enter the path (For example: – $.POD.IMAGE_PATH) where the value of the image will be stored. Note:- Following the POD object, you can enter any random name (For example:- IMAGE_PATH) where the value of image is stored. |
| Image Count Ass Attribute | In this box, enter or define the attribute ID (For example: – $.POD.IMAGE_COUNT, in which the total count of captured images is stored. In this expression, the total count of captured images is stored in the IMAGE_COUNT variable. |
| Keep Deleted Image | In this list, click to select: 1. Yes if you do not want to store the image file locally after the image is captured. 2. No if want to store the image file locally after the image is captured. |
| Default Camera | In this list, click to select: 1. Front if you want to use the front camera to capture the image. 2. Back if you want to use the back camera to capture the image. |
| Compression Required | In this list, click to select: 1. Yes if you want to compress the image after it is captured. 2. No if you do not want to compress the image after it is captured. |
| Camera Template Id | Click this list to select the type of shape, in which you want the image should be displayed after it is captured. For instance: – If you select Document, the image is displayed in the rectangular shape after it is captured. |
| Max Image Allowed | In this box, enter the numeric value (For example:- 4) that specifies the maximum number of image the user can capture of single object/document. |
| Resolution | In this box, enter the resolution of the captured image in the following format: Height of image in pixel unit*Width of image in pixel unit (For example: – 320*640). |
| Image Size Kb | In this box, enter the numeric value (For example: – 1000) in the kilo byte unit. The entered value specifies the maximum amount of size of an image that you can capture. |
- After you enter values in the respective boxes, click Save, and the image source is successfully configured.
- On the Image dialog box, click Save, and the Capture Image control is successfully configured.
Was this article helpful?
YesNo