Navigate
The “Navigate” task allows you to configure the end-user’s journey. In the journey, you can define the navigation between the screens within your app. You can define the navigation between two or more screen by using the following launch mode:
- Standard
- Clear Top
- Single Top
Steps to Configure
- On the <<task group’s name>> page, see the Task panel.
- In the Task panel, search and find the Navigate task.
- Drag the Navigate task from the Task panel to the Execution panel.
- Under Navigate, a group of boxes comes into view.
- In the boxes, configure related properties as follows:
| Box/List | Description | Mandatory |
| Reference Name | In this box, enter the name of the task. Also the system generates a reference name by default. | Yes |
| Destination Screen | You can use this property to define the screen that the app will display after the current screen. To define or configure the destination screen: –> In the Destination Screen box, click the app tree icon ( –> In the Destination Screen area, see the application tree. –> In the application tree, select the screen that you want to display after the current screen.  The vDesigner module offers two types of the screen: 1. Non-entity Type 2. Entity Type The user can map a screen to an entity during the page creation. | Yes |
| Entity Path | In this box, you can configure the entity if you want to map an entity to a page. You can map an entity to a page when the a page is loaded or created. To map an entity to a page: –> In the Entity Path box, click the application tree icon ( –> In the Entity Path area, click the Source list and then select the data source. –> After you select the data source (For example:- Data Store), the Entity Path area displays the tree of the JSON paths. –> Select the path from where you want to map the entity to the page. –> After you select the entity, click Select, and the entity is successfully mapped to the page. In the tree of the JSON path, you can map to the existing entity node [i] or create a new node. To select the existing node, you can search that node by using attribute name, entity, path, etc. To create a new node, click Create New or type entity.attribute[n]. | No |
| Launch Mode | This property helps you define how a new screen appears with the execution of the current task. In the list, select any of the following values: –> Standard (Default) –> Clear Top –> Single Top | No |
| Add Animation | This property allows you to add the animation effect to the page that the application displays after the Navigate task executes. After you click the Add Animation check box, the Navigate panel expands and then displays the following boxes: a. Animation Type b. Duration | No |
| Animation Type | Click the Animation Type box, and then select one of the following options: a. Fade In With this option, the page gradually appears on the app’s screen. b. Slide In With this option, the page slides on to the screen from the left or right. c. Zoom In With this option, the page zooms from the center of the screen. | No |
| Duration (Ms) | In this box, define the speed of the animation. For example, if you enter 300, the duration of the animation will be 300 milliseconds. | Yes |
| Business Rule(Optional Step) | In this box, you can configure a business rule to determine the execution of the Navigate task. If the user’s action satisfies the condition in the business rule, the Navigate task is executed. To configure the business rule: –> In the Business Rule box, click the application tree icon ( –> In the Business Rule panel, click CreateNew to configure the new business rule. Note: – To know more about how a business rule is configured, access the post: Business Rule Widget . | No |
- After you configure the related properties, click Save to configure the Navigate task.
In the “Navigate” task, different screen’s modes are broadly described as below:
- Standard Launch Mode:-
In the “Navigate” task, this is the default launch mode. While configuring the “Navigate” task, if you do not define any launch mode, the application/app uses the standard launch mode by default.
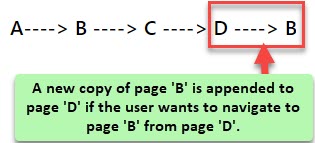
If the user wants to navigate to the previously visited page, the standard launch mode creates a new copy of that previously visited page and then appends it to the current page.
Assume a user navigates from page ‘A’ to page ‘D’ through page ‘B’ and page ‘C’. Thus, the navigate flow represents the following sequence:
A—->B —–> C —-> D
If the user wants to navigate back to page ‘B’ from page ‘D’, the standard launch mode will create a new copy of page ‘B’ and append it to page ‘D’. Thus, the standard launch mode will let the user navigate to page ‘B’ from page ‘D’. In this case, the new navigation flow will represent the following sequence:
A—-> B —-> C —-> D —-> B
- Clear-Top Launch Mode:-
If the user wants to navigate to a page, the clear top launch mode checks if the user has visited that page earlier in the navigation flow. If the user has visited that page earlier, the clear-top launch mode will remove all the pages after the previously visited page in the navigation flow and then take the user back to the previously visited page. Let’s understand this context with the following example:-
Assume the user navigates to page ‘D’ from page ‘A’ through pages ‘B’ and ‘C’. In this case, the navigation flow represents the following sequence:
A—-> B—-> C—-> D
If the user wants to navigate to page ‘B’ from page ‘D’, the clear top launch mode will remove all the pages (page ‘C’ and page ‘D’) after page ‘B’ and then take the user to page ‘B’. In this case, the navigation flow will represent the following sequence:
- Single Top Launch Mode:-
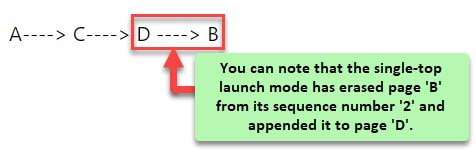
If the user wants to navigate to the previously visited page, the single-top launch mode erases that previously visited page from its sequence number in the current navigation flow and then appends it to the current page. Thus, the user automatically navigates to the previously visited page from the current page.
Assume the user navigates to page ‘D’ from page ‘A’ through pages ‘B’ and ‘C’. In this case, the navigation flow becomes as follows:
A—->B —–> C —-> D
If the user wants to navigate to page ‘B’, the single-top launch mode erases page ‘B’ from its current sequence number ‘2’ and then appends it to the current page ‘D’. Thus, the user can navigate from page ‘D’ to page ‘B’. In the navigation flow, the new sequence number of page ‘B’ will be ‘4’. In this case, the navigation flow will have the screens in the following sequence/order: