
Creating a New Message
Introduction
This feature allows you to create a new message. Thus, you can configure it at multiple places by using the Display Message task.
Creaing a New Custom Message
This feature allows you to create a new custom message. The vDesigner 2.0 module allows you to manage custom messages as message templates that you can use as the reference in several tasks and events where you want to display the messages.
- Static Message: Static messages are plain text/string-based messages that you can use as the reference where you want to display the intended message.
- Dynamic Message: Dynamic messages are also string-based messages, but they also have hard-coded variables in the message string. The hard-coded variables represent the dynamic values. When a respective task executes to display the message, it replaces the hard-coded variable from a specific data value that it fetches from the intended data source.
To create a new custom message:
- In the Message Library panel, click the Create New link, and the Create New page opens.
- On the Create New page, enter/select values as follows:
| Box/List | Description |
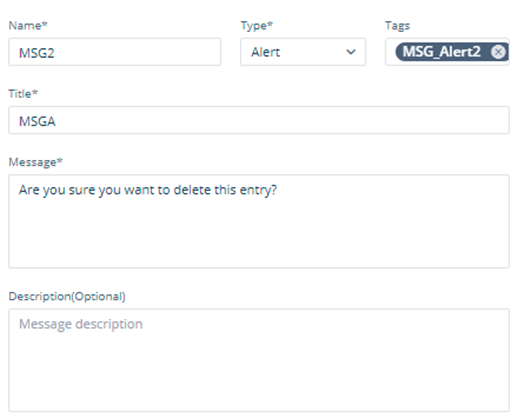
| Name | In this box, enter the name of the message. |
| Type | After you click this list, it allows you to create the following types of the messages: a. Dialog If you select this option, the application displays the messages in the dialog box. b. Progress Dialog1 If you select this option, the application displays the messages in the Progress Dialog1 box. In the Progress Dialog1 box, the progress bar will incrementally progress in circle form ( c. b. Progress Dialog2 If you select this option, the application displays the messages in the Progress Dialog2 box. In the Progress Dialog2 box, the progress bar will incrementally progress in spinner form (  ). ).Note:- The difference between Progress Dialog1 and Progress Dialog2 is that the Progress Dialog1 type displays the message in the dialog box, while the Progress Dialog2 type displays the message in the form of a full page loader. d. Snack Bar If you select this option, the application displays the messages in snack bar format. In snack bar format, application displays the message with black background. |
| Tag | In this box, enter the tag value (For example: – Alert_Msg_123). The tag value can be an alphanumeric value and is used to categorize or group a specific set of the messages. |
| Title | In this box, enter the title of the message. |
| Source | This property allows you to define the icon of the message. When the application displays the message, it displays the icon on the left side of the message. It provides the following options: i. URL:- If you select this option, you can define the icon’s URL. ii. Icon:- If you select this option, it allows you to select the material icon from the material.io icon library. |
| URL | This box comes into view after you select URL in the Source list. In this box, enter the URL of the icon that you want to display with the message. |
| Icon Library | This list comes into view after you select Icon in the Source list. By default, this list displays the Material.io value. It means that you can select a material icon from the material.io library. |
| Icon | This box comes into view after you select Icon in the Source list. In the Icon box, click the Edit icon ( In the Material Icons dialog box, select the icon, and then click Select to select the icon for the message. |
| Icon Color | This property allows you to define the icon’s color. In the Icon Color box, click the left box to open then color canvas. In the color canvas, you can move the circle to define the color of the icon. |
| Message | In this box, you can enter the text or body of the message as follows: i. Creating Text based Static Message: The static message or text based message contains the text based message string. It does not have any dynamic value. 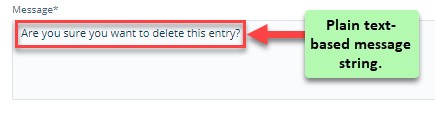 ii Creating Messages with Variables: You can also create a text message along with variables in the message string. In the Message Master Widget module, variables are prefixed with “$” (dollar) sign. When the “Display Message” task is executed, it replaces the variable from a data value that it fetches from an entity in the data source. #Sample Message String with Variable: Hi $Name, your balance is: $X. When the “Display Message” task is executed, it replaces the variable with a specific value and then displays a complete message with the variable’s value. 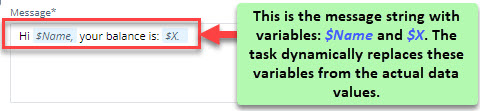 |
| Show “Okay” Button | If you click this check box, the message box displays the Okay button. When the user clicks the Okay button, the message box will be closed. |
| Show “Cancel” Button | If you click this check box, the message box displays the Cancel button. When the user clicks the Cancel button, the message box is closed. |
| Dismissible | If you click this check box, the user can close the message box by tapping outside the message box. |
Setting Parameters
After you create the body of the message, you perform this function to configure the messages with variables. For static messages, you cannot set the parameters. This feature is only available if you have used the variables in the message string with the static text. When the application displays the message text, it replaces the variable with a value that it fetches from the related entity in the data source.
To set the parameters:
- After you enter the details of the message, click Next, and the Set Parameters page opens.
- On the Set Parameters page, perform any of two following functions:
Case1:- (If you have created a plain text message)
- The Set Parameter page displays the message: No Parameter Found, click Save to successfully create the message.
Case2:- (If you have created a message with variables)
- The Set Parameter page displays the list of defined variables.
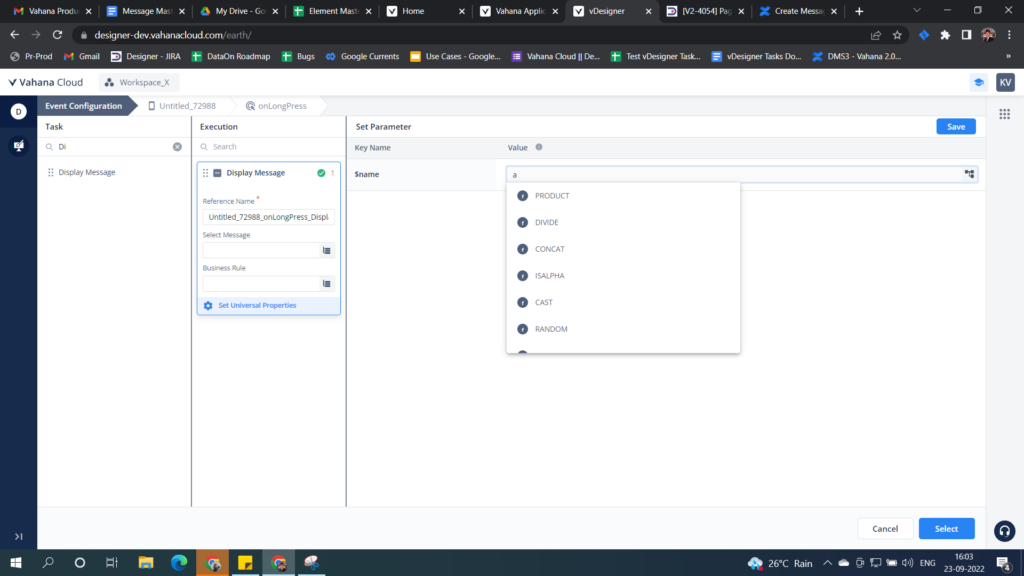
- On the Set Parameter page, click in the func SUM (arg1, arg2) box, and a smart selector expands.
- In the smart selector, in the Search box, enter and then select the name of the attribute from which the application fetches the parameter’s value.
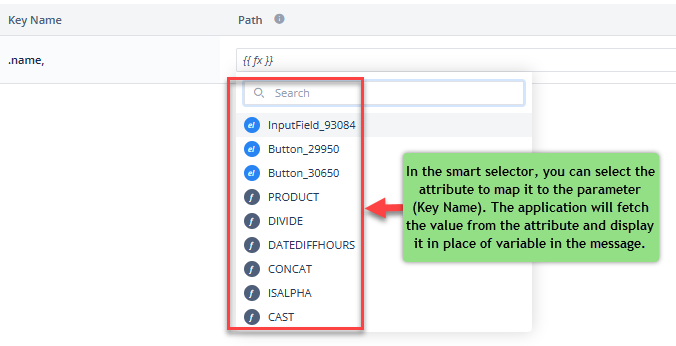
Note:- To fetch the parameter’s value from the related attribute, you need to define the entity and its attribute in the Data Modeler module.
- Repeat from step 5 to step 6 to configure other parameters.
Viewing List of Messages
This feature allows you to view the list of custom messages that you have created earlier in the vDesigner module. The Message Library panel displays the list of messages in two following formats:
- List Format
- Tile Format
In list format, the Message Library panel displays the following details of the message:
- Name of message
- Type of the message (For example: – Dialog, Progress Dialog, etc.)
- Text or body of the message

In tile format, the Message Library panel displays the following details of the message:
- Name of the message
- Type of the message (For example: – Alert Dialog, Progress Dialog, etc.)
- Text or body of the message

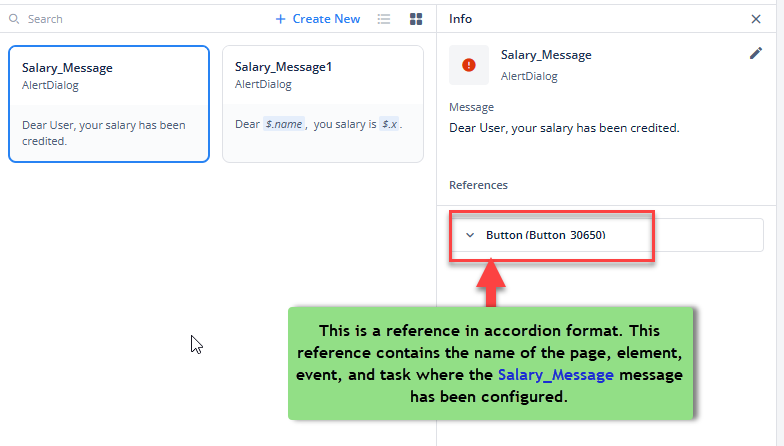
Viewing List of References
This feature lets you access the list of all references where a message has been configured. In the list, the Message Library panel displays the references in accordion format. When you click the down arrow, a reference displays the details of the configured message as follows:
Page(<<page name>>).Button(<<button name>>).<<event name>>.task name(<<Page name>>_<<button name>>_event name_task name).Message Master
To view the list of references:
- In the Message Library panel, find the message for which you want to view references.
- If the Message Library panel displays messages in the tile format, click the tile of the message, and the Info panel opens.
- If the Message Library panel displays messages in the list format, click the name of the message under the Name column, and the Info panel opens.
- In the Info panel, under References, see the list of different references.

Editing a Message
In the Message Library panel, you can edit the details of the earlier created messages as follows:
To edit a message:
- In the Message Library panel, find the message that you want to edit.
- If the Message Library panel displays messages in the tile format, click the tile of the message to edit it, and the Info panel opens.
- If the Message Library panel displays messages in the list format, click the name of the message under the Name column, and the Info panel opens.
- In the Info panel, click the Edit icon (
 ), and the Message Library panel displays the message’s details in editable format.
- In the message’s details, you can edit the following:
- Name and type of message
- Tag
- Title of message
- Source of message
- Message text
Consuming Message
The Message Master Widget module allows you to manage different messages at the application level. It means that you can consume a message for multiple elements and screens but you can consume a single message for a specific element. A message can be consumed by using the following features:
- Display Message Task
- Universal Properties of all tasks
To consume a message, you can use these features as follows:
Display Message Task
To consume a message by using the Display Message task:
- On the Event Configuration page, see the Task panel.
- In the Task panel, search and then find the Display Message task.
Note: – If you do not find the Display Message task, click in the Search box and enter Display Message, and then click the Search icon (![]() ) to find the Display Message task.
) to find the Display Message task.
- After you find the Display Message task, drag it to the Execution pane and then release the mouse button.
- In the Execution pane, the Display Message task expands and displays different properties.
- In the Display Message tree, find the Select Message box.
- In the Select Message box, click the application tree icon (
 ), and the Message Library pane opens.
 - In the Message Library panel, click the name of the message that you want to consume, and the Info panel opens.
- In the Info pane, click Select, and the selected message starts appearing in the Select Message box.
- Click Save, and the message is successfully consumed.
Universal Properties
To consume a message by using the Universal Properties feature:
- In the middle panel, on the mobile phone canvas, find the element on which you want to configure the message.
- Click the element to open its property panel.
- In the property panel, see the group of tabs (
 )
) - In the group of tabs, click the Events icon (
 ), and the property panel displays a list of available events.
 - In the list, find the event (For example:- onClick), on which you want to configure the task.
- Right to the name (For example:- onClick) of the event, click the Add Config icon (
 ), and the Event Configuration page opens.
 - On the Event Configuration page, see the Task panel.
- In the Task panel, find the task (For example: – Call) on which you want to configure the message.
- Drag the task to the Execution panel, the tree of the task expands and displays different properties of the task.
- In the task, click the Set Universal Properties link, and the Universal Properties pane opens.
- In the Universal Properties pane, you can configure the message as follows:
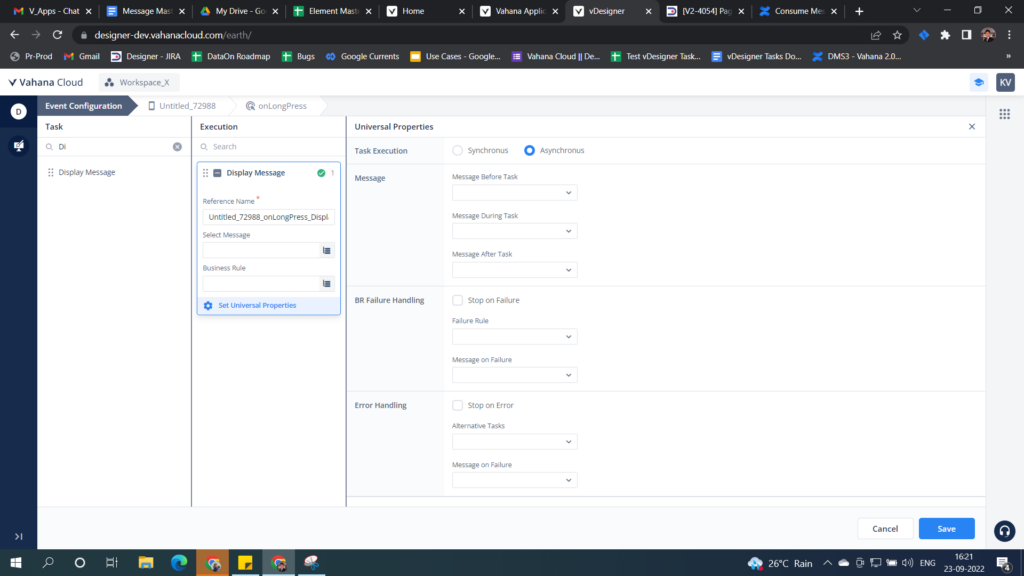
| Property | Description |
| Task Execution | This property provides two options: i. Synchronous Click this option if you want to execute the current task after the previous task completes its execution. ii. Asynchronous Click this option if you want to execute the current task along with other tasks. |
| Message | This property allows you to configure the message in relation to the following stages of the task execution. 1. Message Before Task This property allows you to configure the message that the app displays before the task is executed. To configure the message, click this list to: a. Select the in-built message or, b. Create the new message For instance: – If you apply the “Message Before Task” utility on the message box with the “OK” and “Cancel” buttons, the task will only execute after the user taps OK. Note:- To create/add a new message, visit the section: Creating a New Custom Message. 2. Message During Task This property allows you to configure the message that the app displays during the task execution. |
| BR Failure Handling | This property allows you to manage the business rule failure and to configure the message that the app displays if the business rule’s condition is not satisfied. To manage the business rule failure, you can perform the following functions: a. If you click the Stop on Failure check box, all tasks that were supposed to execute after the current task’s execution will not be executed if the current task fails to execute. b. Click the Failure Rule list and then select the existing business rule or create a new rule. The app will display the message after this business rule’s condition is not satisfied. c. Click the Message on Failure list and then select a message or create a new message. The app will display this message if the selected business rule’s condition is not satisfied. |
| Error Handling | This property allows you to manage the error and to configure the message that the app displays if the error occurs as a result of the specific task’s execution. To manage the error, you can perform the following function: a. If you click the Stop on Error check box, all tasks that were supposed to execute after the current task will not be executed if the current task fails to execute. b. Click the Alternative Tasks list and then select the task that the app/application will execute if the current task fails to execute. c. Click the Message on Failure list to configure the message that the app displays if the current task fails to execute. To configure the message, click the Message on Failure list and then: i. Select the inbuilt message ii. Click the Add New link to create and configure new message Note:- To create/add a new message, visit the section: Create a New Custom Message. |