
Creating Business Rule
Introduction
On the Vahana platform, the Business Rule Manager is an independent module. In the Business Rule Manager, you can create multiple business rules. In a business rule, you define an expression-based condition. The condition contains three parts as follows:
- Left box to define an expression
- Middle box that contains multiple relational operators, such as less than (<), greater than (>), equal to (==), and others
- Right box to define another expression
In the condition, you compare the left-side expression to the right-side expression based on the selected relational operator in the middle box.
In the business rule, if the condition is satisfied, the application performs an intended job. You can apply the business rule in multiple scenarios, such as the user’s action’s validation, satisfying a specific criteria, displaying a specific set of information or error message, and others.
When you create a business rule, the Vahana cloud manages the business rule at the application level.
Accessing Business Rule Manager
To use the business rule in the application, you need to create a business rule in the Business Rule Manager. You can access the Business Rule Manager as follows:
- On the vDesigner module’s dashboard, see the left panel.
- Put the mouse pointer on the left panel to expand it.

- In the left panel, click Business Rules to display the Business Rules page.
After you access the Business Rule Manager module, you can create a business rule as follows:
Creating a New Business Rule
When you create a new business rule, you define the following:
- General details of the business
- Condition in the business rule
To create a new business rule:
- On the Business Rules page, click Create Business Rule to display the Create New page.
- On the Create New page, see the middle panel.
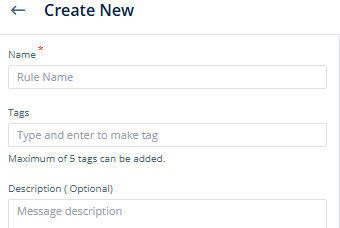
- In the middle panel, enter details of the business rule as follows:
- Name:- In this box, enter the name of the business rule (for example, Check Numeric).
- Tags:- In this box, enter a random value (for example, number or app_HDFC). The tag is used to manage and search a business rule in a group of the multiple business rules.
- Description:- In this box, enter a brief reason to create the business rule or a description of the business rule.
- After you define the name of the business rule, see the right panel on the Check Numeric page.

- In the right panel, you can use different interfaces as follows:
| Interface or Field | Description |
| When block | In the business rule, a “When” block contains a single condition. In the condition, you compare two expressions by using the relational operator. |
| And | Select this tab when you want to validate the user’s action or define the application behavior based on two or more conditions. |
| OR | Select this tab when you want to validate the user’s action or define the application behavior based on a single condition or one of multiple conditions. |
| Left box (When block) | In this box, define the first expression of the condition as follows: 1. Click in the box to display the Search box. 2. Under the Search box, click one of the following tabs: a. Attribute:- Click it to use the attribute’s value in the condition or store the value in the attribute. After you select the Attribute tab, enter the attribute’s name in the Search box to find it. In the list, select an attribute to define the left-side expression. The attribute is primarily defined in the entity. b. BR (Business Rule):- Click it to use another business rule’s condition. After you select the BR tab, enter the business rule’s name in the Search box to find it. In the list, select a business rule to define the left-side expression. c. Element:- Click it to use the element’s value in the condition. After you select the Element tab, enter the element’s reference name in the Search box to find it. In the list, select the element’s reference name to define the left-side expression. d. Entity:- Click it to use the entity’s value in the condition. After you select the Entity tab, enter the entity’s name in the Search box to find it. In the list, select an entity. You define the entity in the Data Modeler module. e. Enum:- Click it to use the enum’s values in the condition. After you select the Enum tab, enter the enum’s name in the Search box to find it. When the application executes the business rule, it fetches all values from the enumeration and then uses them in the condition. f. Functions:- Click it to use the vDesigner functions in the condition. The vDesigner module provides several inbuilt functions, such as static, sum, sort, isalpha, and others. You can use these functions to automate arithmetic and character-based operations and implement other computational algorithms. After you select the Functions tab, enter the function’s name (for example, substr) in the Search box to find it. g. System Data:- Click this tab when you want to use the system data in the condition. The system data includes Android ID, serial number, IMEI (International Mobile Equipment Identity), kernel version, OS version, and others. |
| Middle box (When block) | This box contains relational operators, such as less than (<), greater than (>), equal to (==), and others. You can use a relational operator to compare the left-side expression to the right-side expression. |
| Right box (When block) | In this box, define an expression. The business rule compares this expression to the left-side expression. After it compares two expressions, it returns the result to the application. To define an expression in this box, see the description of the Left box field in the row before the last row. |
| Rule | Click the Rule link when you want to implement two or more conditions in a single rule set. In the business rule, a rule set can have one or more conditions. In a rule set, you can implement multiple conditions (When blocks) with the AND or OR operator. |
| Rule Set | Click the Rule Set link when you want to implement two or more rule sets to define the application behavior. In the business rule, you can implement multiple rule sets with the AND or OR operator. |
- After you define expressions in the related boxes and select the relational operator to compare them, click Create to create a new business rule.
Sample Business Rule
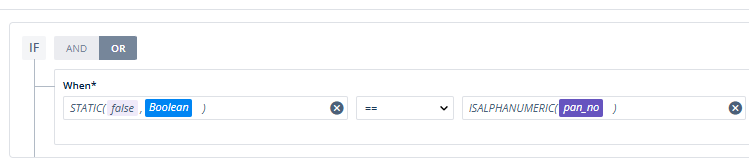
In this screen capture, the business rule’s condition compares two expressions defined in the left-side box and right-side box. In the right-side box, when the ISALPHANUMERIC() function is executed, it checks if the user entered alphanumeric characters in the PAN Number input field. If it finds that the user did not enter alphanumeric characters in the PAN Number field, it returns the false Boolean value. If it returns the false Boolean value, the business rule’s condition is satisfied.
You can use this business rule to display an error message if the end user does not enter alphanumeric characters in the PAN Number input field.
Note:- To know more about the usage of the business rule, you can visit the ISALPHANUMERIC post and other posts under the Text Handling category.
Viewing Business Rule Details
After you create a business rule, the Business Rules page displays the newly created business rule in the list of earlier created business rules. The Business Rules page displays the following details in the record of a specific business rule:
- Name of the business rule
- Description of the business rule
- Registered email ID of the user who last modified the business rule
- Date and time at which the business rule was last modified
After you click a record of the business rule, the Info panel comes into view.
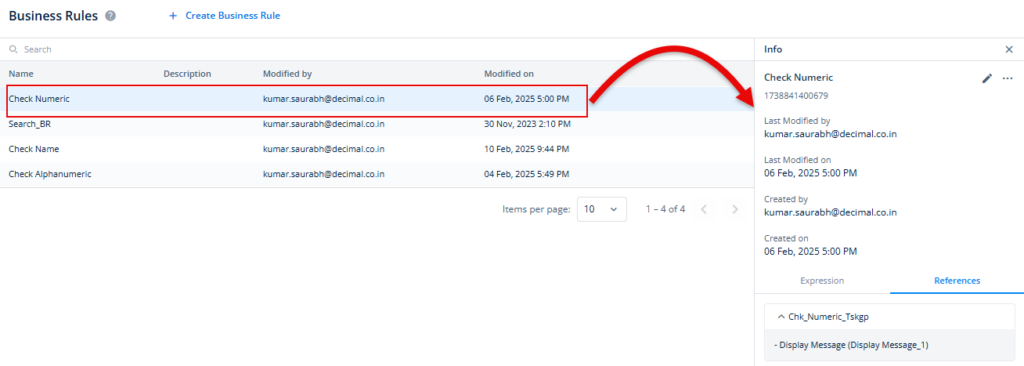
The Info panel display the following information about the business rule:
- A unique business rule ID that the Vahana cloud internally generates
- Registered email ID of the user who created or last modified the business rule
- Date and time at which the business rule was last modified
- Registered email ID of the user who created the business rule
- Date and time at which the business rule was created
- An Expression tab that displays a syntax that helps you determine how the condition was defined in the business rule
- A References tab that displays the name of one or more task groups. The name of a task group specifies that the application user used the business rule in the task group.
To know the usage of different functions in the business rule, click here.