
Online
You can use this mechanism when you want to get the data from an API. The API is configured on the vConnect module. To know more about the API configuration, you can visit vConnect posts under Integration category.
When you want to configure a data source by using the online mechanism, you need to provide the following information:
To configure the data source by using the Online mechanism:
- On the vFlow 2.0 module’s dashboard, see the left navigation panel.
- On the left navigation panel, click the Configurator icon (
 ), and the middle panel displays the list of different pages.
 - In the list of pages, find the page where you want to configure the data source.
- After you find the page, move to the right in the same row, and then find the Edit icon (
 ) to the left of the three-dots icon.
 - Click the Edit icon (), and the middle panel displays the <<Page Name>> page (for example, the Data Submisssion page).
- On the Data Submission page, under Config, click Data, and the middle panel displays the Data Type list.
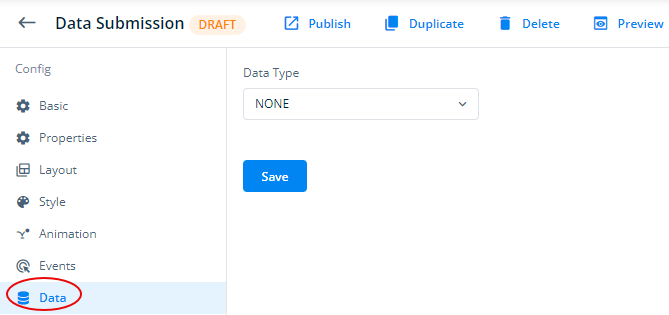
- Click the Data Type list, and then select ONLINE, and the following fields come into view.
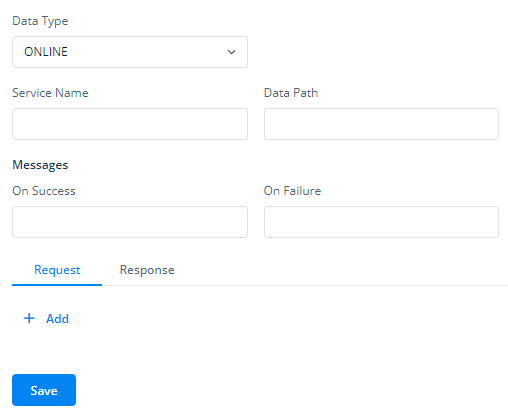
- In these fields, you can enter values as follows:
| Field Name | Description |
| Service Name | Click the Service Name, and it displays the list of configured services. In the list, select the service that you want to configure. The Service Name list displays the list of services that have been previously configured on the vConnect module. |
| Data Path | In this field, enter the data path where the API stores the response that it fetches from the server. |
| On Success | In this field, enter a text message. The application will display this message after API returns the success response. |
| On Failure | In this field, enter a text message. The application will display this message after API returns failure response. |
| Request | When you configure a data source by using the Online mechanism, this tab is selected by default. Under this tab, you can define the request parameters. The request is generated from the front-end application after the user performs a function on the application. To configure request parameters: a. In the Request tab, click Add, and the Key and Value fields come into view. b. In the Key field, enter the parameter’s name (for example, Name). c. In the Value field, enter the parameter’s value (for example, John). d. Click Add to add another set of the Key and Value fields. e. Repeat steps b and c to define the new parameter’s name and value.  |
| Response | When you click the Response tab, the middle panel displays properties related to the API response. You can use these properties to configure the API’s response. You can configure these properties as follows: a. Name:- Click this list, and then select the API to configure its response. b. Data Path:- In this box, define the object (for example, getVal(‘Data‘) that will store the response that the API returns to the application. The API will store the response in the Data parameter. c. Success Key Path:- In this box, define the object (for example, getVal(‘Status‘) that will store the success key (status code) that the API returns after the successful job. d. Success Value:- In this box, define the boolean value (for example, true or false) that the API will return with the response. e. Message Path:- In this box, define the object (for example, getVal(‘Msg’) that will store the response message that the API returns with the response. |
- After you configure the related properties, as described in the last table, click Save to configure the online data source.
To corroborate the configuration details and the object declaration under the Response tab, assume the API returns the following response:
Sample API Response
{
“APINAME”:{
“Status”:”true”,
Data:{
//some data needs to be used in component
}
}
}
In this JSON structure, different keys will have the values as follows:
| Key | Value |
| Name | API Name |
| DataPath | getVal(‘Data’) |
| Success Datapath | getVal(‘Status’) |
| Success Value | True |
Was this article helpful?
YesNo