
Upload Media
This post is referring to Vahana 2 (beta version). To check the document for production, please go to vDesigner-v1.0
The “Upload Media” task uploads a file to the app server. You can configure this task if the end-user has to upload a document from a local device.
Steps to Configure
- On the <<task group’s name>> page, see the Task panel.
- In the Task panel, search and find the Upload Media task.
- Drag the Upload Media task from the Task panel to the Execution panel.
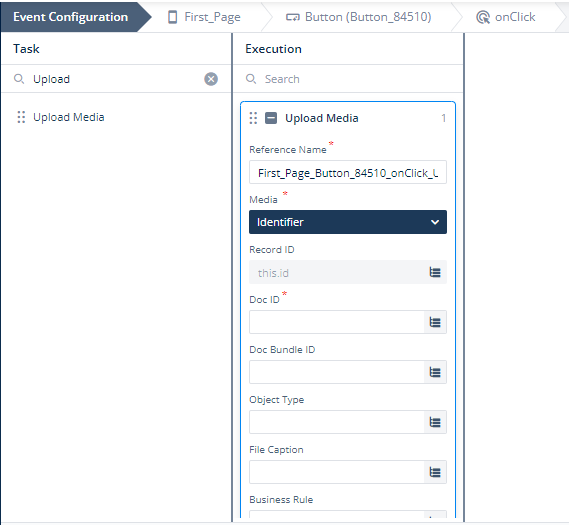
- Under Upload Media, configure related properties as follows:
| Property Name | Description | Mandatory |
| Reference Name | The reference name specifies the name of the task. In the Reference Name box, enter the task’s name. | Yes |
| Media | This property has two options. You can select one of the options as follows: –> Identifier:- After you select this option, it uploads the file by using the name identifier. The name identifier is an alphanumeric value that allows you to manage and distinguish a specific file or set of files at the server level. –> Path:- If you select this option, the “Upload Media” task uploads a file that is stored at a specific path or location. | Yes |
| Record ID (If “media” =”Identifier”) | The record ID is a primary identification key to execute the request for deleting the media. In the Record ID box, in the “this.id” expression, the object “Id” stores the primary identification key. The “Upload Media” task uses this primary identification key to upload the file to the server. | No |
| Doc ID (If “media =”Identifier”) | The doc ID is a unique identifier that is assigned to the media. By using the doc ID, the “Upload Media” task uploads a media. You can either enter the doc ID manually or configure it as follows: To define the doc ID: –> In the Doc ID box, click the application tree icon ( –> In the Doc ID area, click the Source list to select a location where a specific document ID is stored. –> After you select a document ID, click Select, and you successfully configure the doc ID. By using the configured doc ID, the Upload Media task uploads the media. | Yes |
| Doc Bundle ID | This property allows you to configure the doc bundle ID. The doc bundle ID is used as a named identifier to find a group of documents if the Upload Media task has to upload a document from a group of documents. You can either enter the doc bundle ID manually or configure it as follows: To define the doc bundle ID: –> In the Doc Bundle ID box, click the application tree icon ( –> In the Doc Bundle ID area, click the Source list to select a location where the doc bundle ID is stored. –> After you select the location, click Select, and you successfully configure the doc bundle ID. By using the document bundle ID, the Upload Media task finds the group of documents in which it has to upload a specific document to the server. | No |
| Object Type | ||
| File Caption | In this box, you can define the file’s caption to upload the respective file to the server. You can either enter the file caption manually or configure it as follows: To define the file’s caption: –> In the File Caption box, click the click the application tree icon ( –> In the File Caption panel, click the Source list to select a data source where the file caption is stored. –> In the selected data source, select the file’s caption so that the By using the configured file caption, the “Upload Media” task finds the media in the app storage and then uploads it to the server. | No |
| Path (If “media = “Path”) | In this box, enter the path that the Upload Media task will access to upload the file to the server. You can either enter the path manually or configure it as follows: To configure the path: In the Path box, click the application tree icon ( –> In the Path area, click the Source list, and then select a data source (For example:- Data Store) to define the file path. –> After you select a data source, the Path area displays the list of available file paths in the selected data source. –> In the list, select a file path and then click Select, and you successfully configure the file path. The Upload Media task accesses the configured file path and then uploads the file to the server. | |
| Business Rule | In this box, you can configure a business rule to determine the execution of the “Upload Media” task. If the user’s action satisfies the condition in the business rule, the Upload Media task is executed. To configure the business rule: –> In the Business Rule box, click the application tree icon ( –> In the Business Rule panel, click CreateNew to configure the new business rule. | No |
- After you configure the related properties, click Save to configure the Upload Media task.
Was this article helpful?
YesNo