
Call OCR
The term, OCR, stands for Optical Character Recognition. The Call Ocr task is applied to capture the details of any document. A few enterprise mobile apps require capturing imagery and alphanumeric data from many identification documents such as PAN card, Aadhaar card, SSN document, driving license, and others.
To capture the details of the document, this task is incorporated in the workflow of mobile app. When this task executes, it captures the details of the identification documents such as PAN card, Aadhaar card and then stores these details in the configured “array type†JSON object.
To apply the Call Ocr task:
- On the Task dialog box, see the left navigation panel.
- In the Search by task box, enter Call Ocr, and the left panel displays the Call Ocr task.

- In the left panel, click Call Ocr, and the Call Ocr dialog box opens.
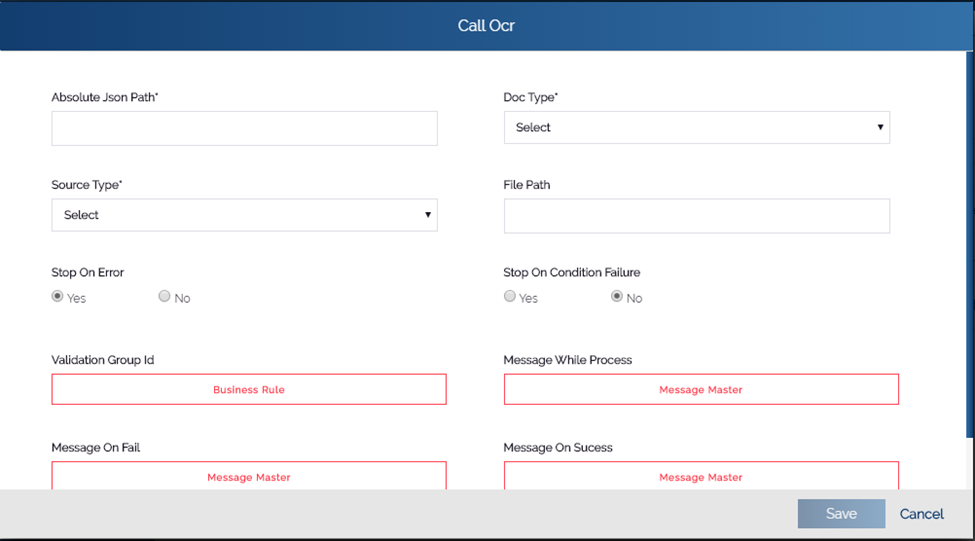
- On the Call Ocr dialog box, enter values in the respective boxes as follows:
| Box | Description |
| Absolute JSON Path | In this box, enter the JSON path where the image or alphanumeric data of the document is stored. The Call Ocr task executes to capture the details of identification documents (PAN Card, Driving License, etc) and then stores these details in the array type JSON object. The syntax of the absolute JSON path is given as follows: #Sample JSON path: $.POD.OCR_RESPONSE After the Call Ocr task captures the details of the document, these details are stored in the OCR_RESPONSE object. |
| Doc Type | Click this list and then select the document type (For example: – UID) whose details are to be captured. |
| Source Type | Click this list to select any of the following values: 1. Camera If you select this option, the mobile app opens the camera to capture the details of the document. 2. File If you select this option, the Call Ocr task accesses the document file that is stored at the configured location. Therefore, it captures the details from the document file. |
| File Path | In this box, you can perform the function as follows: Case1:- (In the Source Type list, if you select Camera) In the File Path box, you need not to enter any value. Case2:- (In the Source Type list, if you select Camera) In the File Path box, enter the path of the location that the Call Ocr task accesses to capture the details of the identification document. Note:- After you enter the path of location in the File Path box, the each file of identification document should be stored at this location so that the Call Ocr task accesses the document at this location and capture the details. |
- After you enter or select the values in the respective boxes, click Save, and the Call Ocr dialog box is closed.
- In the Task dialog box, click Save to successfully configure the Call Ocr task.
Was this article helpful?
YesNo