
Invoke SDK
The SDK Task feature allows users to integrate and configure specific SDK functions into their workflows. Once an SDK is registered using the SDK Manager, users can add tasks linked to the SDK’s functions to their application. This functionality ensures that SDKs can be used effectively to meet diverse use cases.
Key Features and Workflow
- SDK Task Integration
- Introduce SDK tasks into the Events and Task module.
- Ensure that once a user registers an SDK under the SDK Manager, the functions associated with that SDK become visible to the user.
- Task Parameters
- Reference Name: A unique identifier for the task.
- Select: Option to view all functions associated with the SDK task.
- Business Rule: Define the business logic or rules associated with the task.
- Set Universal Property: Additional configuration for broader application.
- Function Visibility and Selection
- When the user clicks on “Select”, all functions associated with the SDK should be visible.
- Users can choose any function to meet their use case requirements.
- Function Configuration
- After selecting a function, users are redirected to a configuration page.
- The configuration page allows users to fill in the required settings for the selected function.
- Upon clicking “Save”, the configuration is saved, and the function is attached to the task.
Key Use Case
- Task-Based Execution
- Users can configure and attach SDK-based tasks to application elements for seamless execution of SDK functionalities.
Steps to Configure
- On the <<task group’s name>> page, see the Task panel.
- In the Task panel, search and find the Invoke SDK task.
- Drag the Invoke SDK task from the Task panel to the Execution panel.
- Under Invoke SDK, a group of boxes comes into view.
- In the boxes, configure related properties as follows:
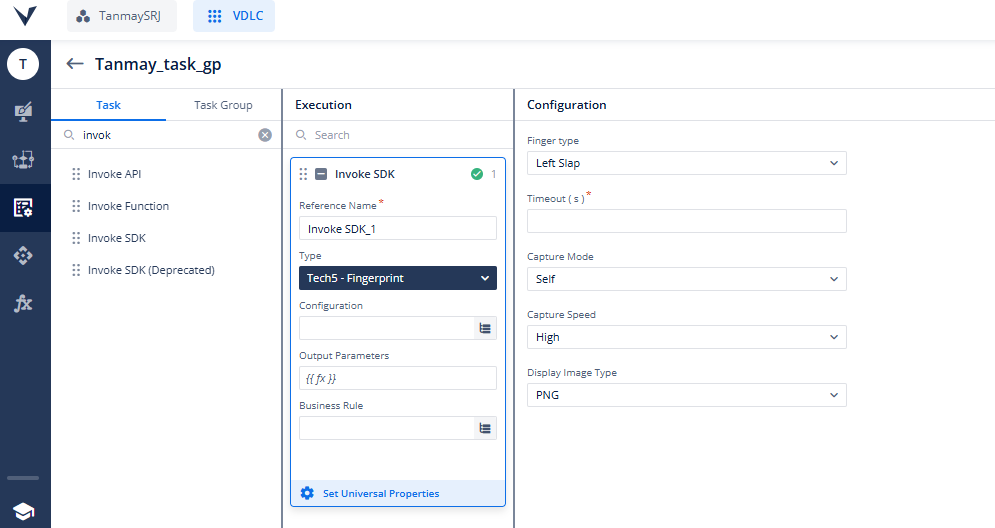
| Property Name | Description |
| Reference Name | The reference name specifies the name of the task. In the Reference Name box, enter the name of the task. |
| Type | Choose the type of SDKs, you have registered. Learn about registering SDK here. There are commonly three SDKs available until now: 1. Tech5 – Fingerprint 2. Firebase 3. Tech5 – Face Note: These SDKs are subjected to change and may increase in future. |
| Configuration | Configuration varies according to the type of SDK selected. After selecting the SDK type, click the application tree icon ( Tech5 – Fingerprint: 1. Finger Type: Select the type of fingerprint to capture, ensuring accuracy in identity verification. Options include Left Slap (Simultaneously captures fingerprints of all four fingers of the left hand), Right Slap (Simultaneously captures fingerprints of all four fingers of the right hand.), Left Thumb, Right Thumb, Left Index Finger, Right Index Finger, et-cetera. 2. Timeout (s): Defines the maximum time (in seconds) allowed for fingerprint capture, ensuring the process remains efficient and user-friendly. 3. Capture Mode: Specifies the interaction model during fingerprint capture: – Self: Allows individuals to capture their fingerprint independently. – Operator: Facilitates capture under the guidance of an operator, ensuring proper alignment and accuracy. 4. Capture Speed: Determines the speed of fingerprint capture to match the environment or user requirements: Low, Medium or High 5. Display Image Type Allows users to choose the format in which the captured fingerprint image will be displayed. Supported formats include: – PNG: A widely used format for clear and compact images. – BMP: A raw image format ideal for detailed fingerprint scans. – WSQ: A format specifically optimized for fingerprint images, offering high-quality compression without loss of crucial details. These configurations are vital for tailoring the task to meet specific operational needs, ensuring seamless integration and effective fingerprint capture. Tech5 – Face When applying the Tech5 – Face task, proper configuration ensures high-quality facial biometric functionality for secure and accurate identity verification. Below are the configuration settings: 1. Camera: Selects the camera to be used for facial capture: Front: Uses the device’s front camera, suitable for capturing the user’s face directly in selfie mode. Back: Uses the device’s back camera, typically for capturing another individual’s face in operator-assisted scenarios. 2. Timeout (s) Specifies the maximum time (in seconds) allowed for completing the facial capture, ensuring the process remains efficient and user-friendly. 3. Auto Capture Determines whether the system automatically captures the face when the required conditions are met: True: Automatically captures the face when it is properly aligned and focused. False: Requires manual intervention to capture the face. 4. Enable Close Eye Enables or disables facial capture when the subject’s eyes are closed: True: Allows the system to capture the face even if the subject’s eyes are closed. False: Ensures facial capture only when the eyes are open, improving accuracy for certain use cases. 5. Compression Determines whether the captured facial image should be compressed to save storage and optimize transmission: True: Compresses the image file. False: Keeps the image in its original quality. 6. Compression Quality Defines the level of quality for the compressed image, balancing file size and image clarity. Higher values result in better image quality but larger file sizes. These configurations allow the Tech5 – Face task to be tailored to various operational requirements, ensuring high-quality, reliable, and efficient facial biometric capture. Firebase: Configuration detail of Firebase SDK depends on the function you choose: 1. Functions: There are three options to choose from: Log Event, Log User Data and Generate FCM Token. – Log Event: Use this function to track specific user interactions or actions within the application. For example, logging a button click, form submission, or navigation between pages. Parameters include an Event Name and optional Key-Value Pairs for additional properties. – Log User Data: Use this function to record specific information about the user. For example, identifying a user by their unique ID or storing other user-related attributes. Parameters include a User ID and optional Key-Value Pairs for additional properties. -Generate FCM Token: This function in Firebase SDK retrieves a unique token for enabling push notifications via Firebase Cloud Messaging (FCM). If the FCM token is not generated automatically, this function mapped with an event ensures that the token gets generated. 2. Event Name: This field appears if you choose ‘Log Event function’. This is a mandatory field. It specifies the name of the user interaction or action being tracked, such as a button click or page navigation, with a maximum of 70 characters. 3. User ID: This field appears if you choose ‘Log User Data function’. This is a mandatory field. It identifies the user associated with the logged data, selected from elements, attributes, or static functions. 4. Key: It’s a string that represents the property name for additional data to be logged. 5. Value: It represents the value associated with a property key. It allows elements, attributes, or static functions. You can add more key value pairs by clicking +Add New button. |
| Output Parameters | This field appers when Tech5 – Fingerprint type or Tech5 – Face type is selected. |
| Business Rule | This property allows you to build a business rule related to the execution of the task. If the user’s action satisfies the condition in the business rule, the Invoke SDK task is executed. To configure the business rule: – In the Business Rule box, click the application tree icon ( – In the Business Rule panel, click CreateNew to configure the new business rule. |
Was this article helpful?
YesNo