
Scheduling Service on Execution Portal
On the Execution portal, you can schedule a vConnect service as follows:
- On the Vahana portal’s dashboard, see the Scheduled Jobs tile.
- Click the Scheduled Jobs tile, the Jobs Listing page opens.
- On the Job Listing page, click Add New Job, and the Schedule Job page opens.
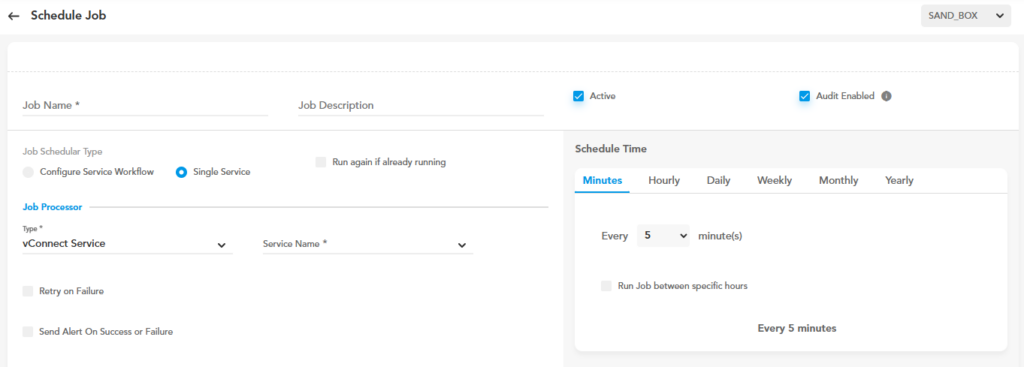
- On the Schedule Job page, perform the following functions to schedule a job:
| Property/Field | Description |
| Job Name | In this field, enter the job’s name (for example:- SCHEDULER_CLEAN_OBJECT). |
| Job Description | In this field, enter a brief job’s description. |
| Configure Service Workflow (Job Scheduler Type area) | In the Job Scheduler Type area, select this option |
| Single Service (Job Scheduler Type area) | In the Job Scheduler Type area, this option is selected by default. You can choose this option when you want to schedule a specific service. |
| Configure Service Workflow | In the Job Scheduler Type area, select this option when you want to schedule two services. In this scenario, the first service’s output will serve as the input for the second service. |
| Run again if already running (Job Scheduler Type area) | If you click to select this check box, the vScheduler module reruns job at the configured time scheduled time even after the job continues to run beyond the scheduled time due to network traffic or other operational reasons. |
- Thus, you can have two following cases:
Case1:- (In the Job Scheduler Type area, if you click the Single Service option)
- In the Job Processor area, click the Type list and then select vConnect Service.
- Click the Service Name list and then select the vConnect service (for example:- AUTH) that you want to schedule.
Case2:- (In the Job Scheduler Type area, if you click the Configure Service Workflow option)
- After you click the Configure Service Workflow option, the Input Data Source area comes into view.
- In the Input Data Source area:
- Click the Type list and then select vConnect Service.
- Click the Service Name list and then select the first service.
Note:- The first service’s output is used as the input for the second service. You configure the second service under Job Processor.
- In the Job Processor area:
- Click the Type list and then select vConnect Service.
- Click the Service Name list and then select the second service.
- After you select the vConnect service, perform the following functions:
| Property | Description |
| Retry on Failure | When you select this check box, the vScheduler module will rerun the job after it fails to perform the intended function. |
| Send Alert On Success or Failure | When you select this check box, the Schedule Job page expands. After you select this check box, perform the functions as follows: Under Alert: i.) Click Only Failure to send the alert when the service fails. ii.) Click All to send the alert when the service fails or performs the function successfully. Under Send Alert To: i.) If you click Group, the vScheduler module sends the alert to a predefined group of users. After you click Group, the Select Groups list appears. In the Select Groups list, select a group of users if you want to send the alert to the users of the selected group. ii.) If you click User, the vScheduler module sends the alert to a specific user. After you click User, the Select Users list appears. In the Select Users list, select a user who you want to send the alert. |
| Active | This check box by default is selected. The selected Active check box means that the service is active and will run at the scheduled time. If you click to clear the Active check box, it means you turn the service inactive, and it will not run at the scheduled time. |
| Audit Enabled | This check box by default is selected. The selected Audit Enabled check box means that when the scheduler runs a service at the scheduled time, the VRT (Vahana Run Time) will generate all logs, including audit logs (logs related to the service’s request and response) and error logs. If you click to clear the Audit Enabled check box, the error logs is generated related to executed service through scheduled job. In this case, it will not generate audit logs. When the scheduler executes a service at the scheduled time, the logs are generated based on the Audit Enabled property’s configuration on the Scheduled Job portal. This application behavior applies only if the scheduler executes the service through the Scheduled Jobs portal. In other scenarios of the service execution, such as when a front-end application consumes the service, the VRT module generates logs based on the Audit Enabled property’s configuration on the vConnect portal. |
- After you select the vConnect service and users, see the Schedule Time area.
- In the Schedule Time area, you can schedule the time as follows:
| Tab | Description |
| Minutes | If you click the Minutes tab: In the Every list, select the time (for example:-5) in minutes. The vScheduler module will rerun the job after the interval of the selected time in minutes. |
| Hourly | If you click the Hourly tab: In the Every list, select the time (for example:-5) in hours. In the hour(s) on minutes list, select the time in minutes. The vScheduler module will rerun the job after the interval of the selected hours and minutes. |
| Daily | If you click the Daily tab: In the Every list, select a specific day (for example:-2). In the days at lists, select hour and minute. After you select a day, hour, and minute, the vScheduler module will run the job on the selected day and at the selected time of each month. If you click Every working day at, this option allows you to schedule the job at a specific time on each working day of the month. After you click to select Every working day at, click the first list to select the hour unit, and then click the second list to select the minute unit. Thus, vScheduler will run the job on each working day at the selected time.  |
| Weekly | If you click the Weekly tab: Click the check box to select the related days (for example:- Monday, Friday). Thus, click the at list and then select the time.  |
| Monthly | If you click the Monthly tab: If you click to select the first On the option: 1. Click the first list to select the day of the month 2. Click the second list to select the month 3. Click the pair of lists to select the time After you select the month, day, and time, vScheduler will run the job in the selected month, on the selected day, and at the selected time. When you click the during the nearest week day check box, vScheduler runs the job on the next closest working day if the weekend or holiday occurs on the scheduled day. If you click to select the second On the option: 1. Click the first list to select the week (for example:- Second) week of the month. 2. Click the second list to select the day (for example:- Thursday) of the week. 3. Click the “of every” list to select the monthly time to run the job periodically after the selected monthly time is passed. 4. Click the “month(s) starting in” list and then select a month (for example:- April). vScheduler will run the job from the April to December based on the configuration. 5. In the “at” group of lists, click the pair of lists to select the time to run the job. 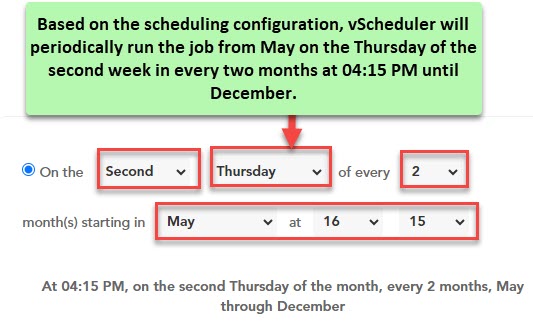 |
| Yearly | If you click the Yearly tab: If you click the Every option: 1. Click the first list to select the month (for example:- June) to run the job 2. Click the second list to select the day (for example:- Thursday) 3. In the “at” group of lists, click the pair of lists to select the time to run the job. 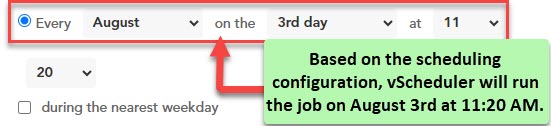 When you click the during the nearest week day check box, vScheduler runs the job on the next closest working day if the weekend or holiday occurs on the scheduled day. If you click the “On the” option: 1. Click the first list to select a week (for example:- third) to run the job. 2. Click the second list to select the day (for example:- Friday) of the selected week to run the job. 3. Click the third list to select the month (for example:- October). 4. In the “at” group of lists, click the pair of lists to select the time to run the job. 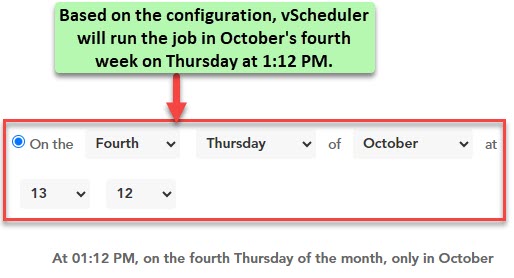 |
- After you select the vConnect service, users’ group, and schedule the job execution time, click Save to schedule the job.
Was this article helpful?
YesNo