
Database
This feature allows you to configure DB (Database) APIs. The DB APIs are the database store procedures or functions. These store procedure and functions contain a SQL statement that connects with the database and returns the result.
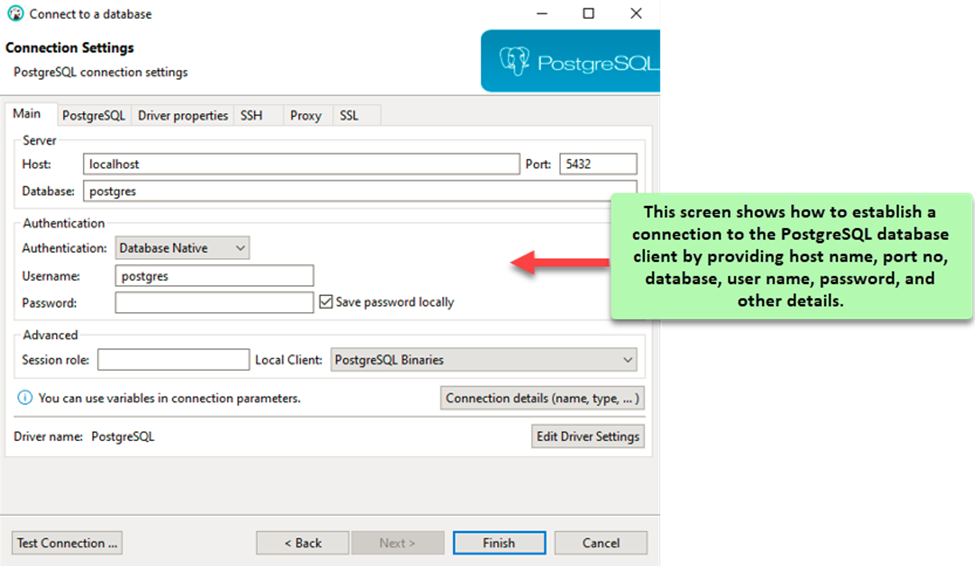
To create a DB API, you access a database client such as Oracle, MYSQL, or Postgres SQL. In the database client, you build a store procedure or function to create a DB API. Thus, you need to configure the DB API on the vConnect platform.
To configure the DB API:
- On the home page of the vConnect module, see the API Management tab.

- Click the API Management tab to display the API Management page.
- On the API Management page, click Add New API to display types of APIs that you can configure.

- In the API Type area, click Database to display the following boxes:
| List/Box | Description |
| API Name | In this box, enter the name of the API (for example:-Authenticate). |
| Query Timeout | In this box, enter the numeric value (For example:- 120) in “seconds” (unit of time). This value specifies the maximum amount of time until the query attempts to connect to the database. If the query’s attempt to connect to the database exceeds the query timeout, the API will display error. |
| Description | In this box, enter a brief description of the API. |
| DB Definition Id | For the database API, this property allows you to configure the database that the DB (database) API connects to fetch the response. To configure the database: –> Right to the DB Definition Id box, click the plus icon ( –> On the Add New Database dialog box, enter the values in the respective boxes as follows: 1. Database Connection Name: – In this box, enter the name of the database connection. 2. Type of Database: – Click this list to select the database (for example: – Oracle). 3. Load Balancer: – Click this list and then select Y to use the load balancer for database configuration. Otherwise, select N. (Optional step) 4. IP Address: – Click this list to select the IP address of the database. 5. Port Number: – Click this list to select port number to connect to the database. 6. Database Name: – Click this list to select the name of the database client. Note: – You define a name of the database when you configure a database client on your computer system. Refer the earlier screen capture of Postgres SQL Connection screen. 7. Schema Name: – Click this list to select the name of the schema. (Optional step) 8. User Name: – Click this list to select the user name so that the API can access the database. Note: – You also define a user name and a password to create a user account at the database level when you configure a database client on your computer system. 9. Password: – Click this list to select the password so that the API can access the database. 10. Connection Pool: – Click this list and then select Y to establish a connection pool that maintains the cache of the database connection. (Optional step) 11. Max Active Conn: – Click this list to select the value that specifies the maximum number of active connections that the API can establish with the database. (Optional step) 12. Max Ideal Conn: – Click this list and then select the value that specifies the maximum number of connections or queries that can connect to the database concurrently. (Optional step) 13. Max Wait Timeout: – Click this list and then select the maximum time that the query will be active to connect with database and get the result. If the query’s active session time exceeds the maximum wait timeout, the query will throw an error. |
| Execution Type | Click this list to select an execution type. The execution type defines how an API will return the response to the application or source of the API request. You can select one of the execution types as follows: a. PROCEDURE: – Select this option if you want to use the store procedure to connect to the database. After you select this option, the Procedure Name list appears. b. FUNCTION: – Select this option if you want to use the function to connect to the database. After you select this option, the Function Name list appears. When you select the FUNCTION option, the API returns the response as follows: 1. Response in JSON format by using the refcursor return type. 2. Response in string format by using the JSON or text return type. c. FUNCTION_V2:- Select this option if you want to use the function to connect to the database. When you select the FUNCTION option, the API returns the response in JSON format by using the refcursor, JSON, and text return types. When you decide to select the function option to configure the Execution Type property, you are recommeded to select the FUNCTION_V2 in place of the Function option. The reason for this recommendation is that the API with the FUNCTION_V2 execution type returns the response in platform independent-JSON format. The API with the FUNCTION execution type returns the response in string format. For the front-end application, it becomes difficult to manage and process the response in string format. d. QUERY:- Select this option if you want to use a SQL query to connect to the database. The query’s statement is embedded in the code of the API. When you select the QUERY option, the API returns the response. The response contains data in a multi-level nested format. e. QUERY_V2:- The QUERY_V2 is an enhanced version of the QUERY option. When you select the QUERY_V2 option, the API returns the response without a nested structure in string format. f. QUERY_V3:- The QUERY_V3 option is an enhanced version of the QUERY and QUERY_V2 options. The API with the Query_V3 execution type returns the response in comprehensive and structured JSON format, while the QUERY and QUERY_V2 options return responses in complex string format that the front-end applications find it difficult to manage. |
| Procedure Name | Click this list to select the procedure. In the selected procedure, the query executes to connect to the database and get the result. |
| Function Name | Click this list to select the function. In the selected function, the query executes to connect to the database and get the result. |
| Logs Required | Click this check box to maintain the logs of API. |
| Connection Pool | Click this check box to maintain the database connection in the cache. |
- After you select the procedure or function, the Parameters Definition area appears.
- The Parameters Definition area displays the list of non-editable parameters that are defined in the code of API.
- In the Parameters Definition area, configure the parameters as follows:
| List/Box | Description |
| End Point Param Name | This field displays the name of parameter that is defined in the code of API. |
| Source of Value | Click this list and then select a specific source (For example: – REQUEST_BODY or HEADER) from where the parameter will fetch the value. |
| Value | In this field, enter a parameter. You map this parameter to a value or absolute JSON path of an element (for example: – text box) when you configure the API on an element (for example: – button) in the vDesigner module. Let’s explore how to define a parameter when you select HEADER or REQUEST_BODY in the Source of Value list. Case1:- (If you select HEADER in the Source of Value list) –> The End Point Param Name box displays the name of parameter (For example: – org_id) that is defined in the code of API. –> In the Source of Value list, select HEDAER. –> In the Value box, enter x_org_id. –> Scroll down and then click Save to configure the parameter.  Case2:- (If you select REQUEST_BODY in the Source of Value list) –> The End Point Param Name box displays the name of parameter (For example: – login_id) that is defined in the code of API. –> In the Source of Value list, select REQUEST_BODY, and the Value box displays the dollar character ($) that is followed by the dot (.) character. –> After the dot (.) character, enter a parameter (for example:- x_login_id). –> Scroll down and then click Save to configure the parameter. 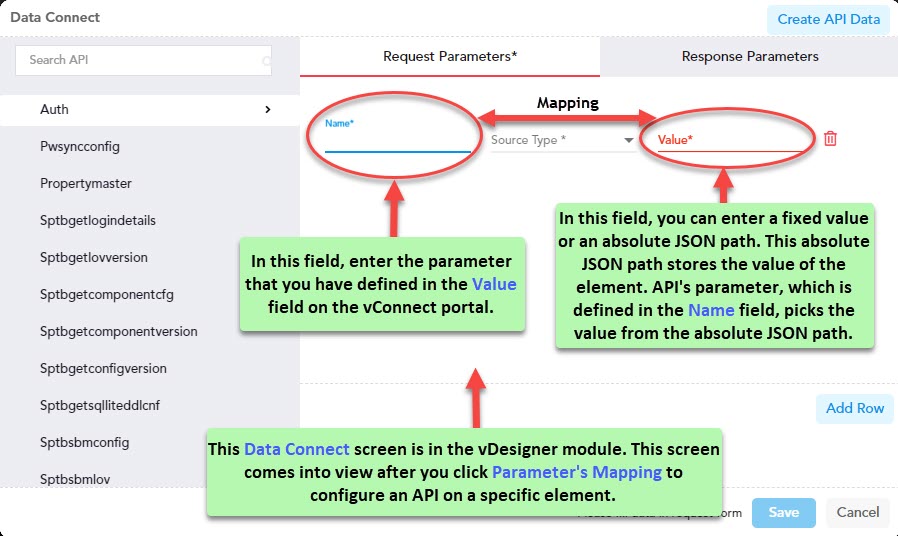 |
Was this article helpful?
YesNo