
Account Management
In the Vahana cloud, you can use the Account Management module to manage your account, create and manage workspaces under your account, invite new members to your workspace, and access multiple resources, such as apps, APIs, rules, data models, etc. When you access the Account Management module, it displays two sub-modules. These sub-modules are as follows:
| Sub-module | Description |
| Accounts | When you access the Accounts sub-module, you can perform the following functions: 1. Editing and Viewing Account Details: When you access the Accounts sub-module, it displays your account’s details. In the account’s details, you can only edit the account’s name.When you successfully register with the Vahana cloud, it automatically creates your default account (for example, KumarTSX). In the default account, the Vahana cloud creates a default workspace. After successful registration with the Vahana cloud, when you access the Vahana portal, you access it in your default workspace. 1. Creating a New Workspace: The term workspace, specifies the virtual workspace on the Vahana cloud. In the account, you can treat a workspace as a unique virtual space. In a workspace, you can separately manage users and resource groups (Apps, APIs, Rules, Data Models, etc.) so that users can develop, deploy, and manage applications seamlessly. Apart from default workspace, an account owner can create and manage multiple workspaces. In each workspace, the user can develop and manage applications separately. |
| Workspace | When you access this sub-module, it displays all workspaces that you created or joined earlier. If you create a workspace, you act as the account owner of that workspace. If you join a workspace, you become a member of that workspace. When you access a workspace, you can view the following: a). Details of the currently accessed workspace b). Transfer Workspace link (If you are the owner of the currently accessed workspace) c). List of members of the currently accessed workspace d). List of applications created in the workspace |
In the Account Management module, you can perform different functions as follows:
Accessing Account Management Module
You can access the Account Management module as follows:
- On the Vahana portal’s home page, see the top panel.

- In the top panel, see the Account Management icon (
 ).
). - Click the Account Management icon to display a context menu.
- In the context menu, click Account Management to display the Account Management page.
- The Account Management page displays the list of two types of accounts:
- The account that you are owner of
- The account under which you are the member of one or more workspaces
Viewing Account’s Details
After you access the Account Management module, you can access details of an account as follows:
To access and view details of a specific account:
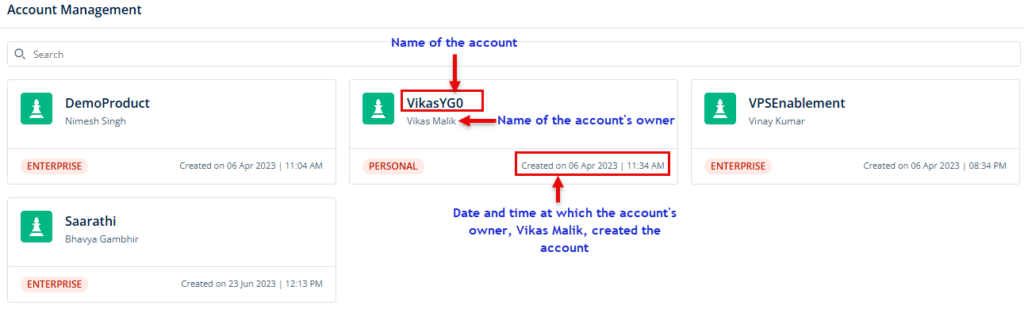
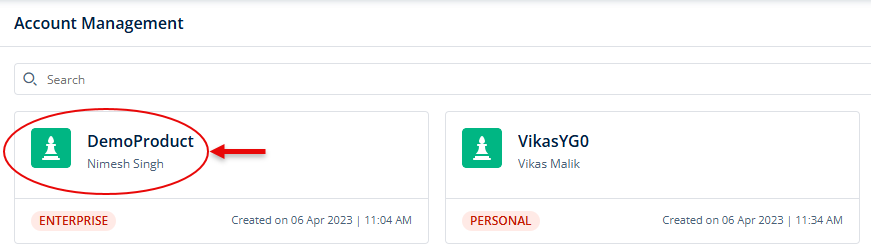
- On the Account Management page, search and then find the account (for example, DemoProduct) to access its details.
- After you find the account, double-click it to display its details.
- The Account Management page displays the following details of an account as follows:
- <<Account Name>> panel
- The unique account ID managed by the Vahana cloud
- License Type (Basic) of the account
- Name of the user who owns the account
- The name of the user who created the account
- The date and time at which the user created the account
- Members panel
- A Search box to search the member from the list of members in the account
- The list of members of the account (list of users who are members of one or more workspaces under this account) with the following details:
- Name of the member
- Registered email ID of the member
- Member’s role
- A three-dot icon (
 ) to delete the member
- <<Account Name>> panel
Account
In the Account module, you can do the following functions:
Creating a New Workspace
When you perform this function, you create a new custom workspace. A custom workspace is different from the default workspace. The Vahana cloud creates a default workspace when it creates your Vahana account. You can create a custom workspace after you access the Vahana portal.
To create a new workspace:
- On the Account Management page, click in the Search box and then search and find the account (for example, DemoProduct) to create a workspace under it.
- After you find the account name, double-click it to display its details.
- On the Account Management page, see the left panel.
- Put the mouse pointer on the left panel to expand it.
- In the left panel, click Workspaces (
 ) to display the Workspaces page.
 - On the Workspaces page, in the top panel, click Create Workspace to display the Create Workspace dialog box.

- In the Create Workspace dialog box, enter the details as follows:
| Field/Property | Description |
| Name | In the Name box, enter the name (for example, HDFCacc_worksapce) of the workspace. |
| Select Icon | Under Select Icon, you can do one of the following functions: a. Click to select one of the available icons. b. Click the plus sign to select and upload the icon from the local drive. |
| Description | In this box, enter or write a brief reason to create the workspace. |
- After you enter the details of the workspace, click Create to create a new workspace.
Editing Account’s Details
To edit an account’s details, you need to access the account. In the account’s details, you can only edit the account’s name. Other data remains non-editable for the account.
To edit the account’s name:
- On the Account Management page, search and find the account (for example, VikasYG0) to change its details.
- After you find the account (for example, VikasYG0), click it to display the Info panel.
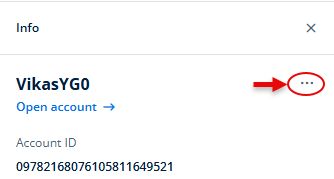
- In the Info panel, see the three-dot icon (
 ).
). - Click the three-dot icon to display the context menu.
- In the context menu, click Edit to display the Edit Account dialog box.
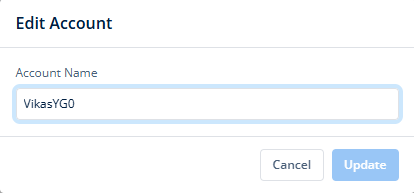
- In the Edit Account dialog box, change the account’s current name in the Account Name box, and then click Update to change the account’s name.
Workspace
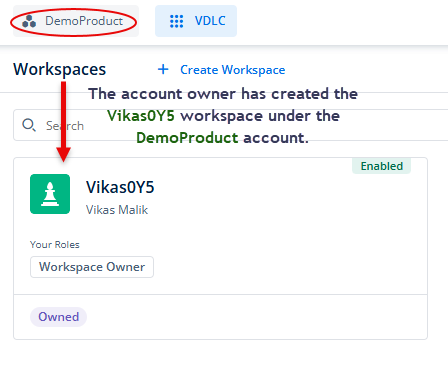
On the Account Management page, when you double-click an account, it displays the details of the account. Thus, you need to put the mouse pointer on the left panel to expand it. In the left panel, you click Workspaces to display different workspaces under the currently accessed account. If you see the following screen capture, you will find that the account owner created the Vikas0Y5 workspace under the DemoProduct account. The account owner can create other workspaces apart from the Vikas0Y5 workspace under the DemoProduct account.
Under an account, you serve as an owner or a member of these workspaces. When you create a workspace, you become the owner of that workspace. When another workspace’s owner sends you the invitation to become the member of the workspace, and you accept the invitation, you become the member of that workspace.
You also act as the owner of your default workspace. In the Workspace sub-module, you can perform the following functions:
Viewing Workspace Details
To view the details of a workspace:
- On the Account Management page, click in the Search box and then search and find the account (for example, DemoProduct) to view the details of a workspace under it.
- After you find the workspace (for example, DemoProduct), double-click it to display its details.
- Put the mouse pointer on the left panel to expand it.
- In the left panel, click Workspaces to display the Workspaces page.
- The Workspaces page displays the list of different workspaces.
- In these workspaces, you can have one of the following roles:
- Workspace Owner
- Workspace Member
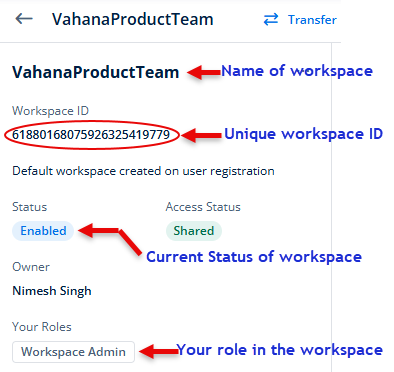
- In the list of workspaces, double-click a workspace (for example, VahanaProductTeam) to view its details.
- In the <<workspace name>> page, in the second left panel, you can see the following details of a workspace:
- Name of workspace
- Twenty four digits unique workspace ID
- Description of workspace
- Current status of workspace (Enabled or Disabled)
- Access Status of the workspace (Shared or Owned)
- Name of workspace owner
- Your role in the workspace (for example, workspace admin)
Transfer Workspace
In the Workspace sub-module, you can only see the Transfer link if you have created that workspace. If you are only a member of a workspace and you have not created that workspace, the <<workspace name>> page will not display the Transfer link. The “Transfer” feature allows you to transfer the ownership of the workspace to another user of the Vahana cloud.
After you transfer the ownership of the workspace to another user, you do not act as the owner of the workspace.
To transfer the workspace:
- On the <<workspace name>> page, see the top panel.
- In the top panel, click Transfer to display the Transfer <workspace name>> dialog box.
- In the Transfer <<workspace name>> dialog box, in the New Account ID box, enter the unique account ID of the user to transfer the ownership.
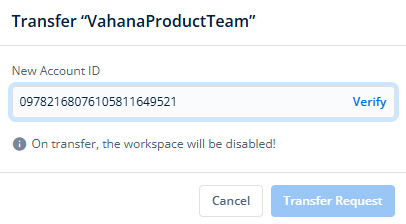
- After you enter the account ID in the New Account ID box, click Verify to validate the account ID.
- After the Vahana cloud validates the account ID, the dialog box displays the details of the verified account ID as follows:
- Account Name
- Account’s Owner
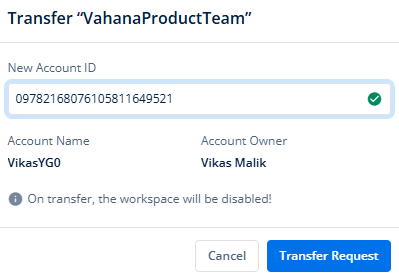
- After you make sure that you are transferring ownership to the right person, click Transfer Request to transfer the ownership of the current workspace.
After you submit the request to transfer the ownership of the workspace, the Vahana cloud sends the request to the account owner. After the account owner approves the request, the account owner becomes the owner of the workspace.
Apart from viewing the workspace’s details and transferring workspace’s ownership, you can view the following on the <<workspace name>> page:
- List of users who are members of the current workspace
- List of applications that you or other members created in the current workspace
You can view lists of users and applications as follows:
Members Tab
In the <<workspace name>> page, when you click the Members tab, it displays the following details of the workspace members:
- Name of user who is member of the workspace
- Registered email ID of the user
- Role of the user in the workspace
Applications Tab
In the right panel, when you click the Applications tab, it displays a list of applications that the workspace owner has created earlier. The Applications tab displays the following details of applications:
- Name of application
- Name of the user (application owner) who created the application
- Type of the application (for example, Middleware, Mobile, Web-vFlow, etc)
- Current status of the application (for example, Enabled, Transfer Pending, etc)
- A three-dot icon () to duplicate the application
To know more about duplicating an application, click here to go to the Applications post and then see the Duplicating an App heading section.