
Setting Build Properties for Application in vFlow
Before you create a build for the application designed in the vFlow module, you need to configure several properties at the following levels:
- App-level Settings:- In this section, you select the icon, define the version number, version name, loading strategy, and others for the application’s build.
- Middleware Settings:- This section primarily allows you to configure properties that enable the connection between the application and middleware-incorporated modules, such as vConnect, VRT, and others. Also, you can configure the S3 bucket’s name and ID so that you can store a variety of data, including documents, images, videos, logs, and others, in easily accessible object format.
- Security:- In this section, you can configure check box-based security-related properties. It contains properties related to the debugger, single sign-on, and copy-paste function.
To configure the build settings:
- On the Applications page, search and find the application (designed in vFlow) to create its build.
- After you find the application, click its name to display the Dashboard page.
- On the Dashboard page, see the left navigation panel.
- Put the mouse pointer on the left panel to expand it.
- In the left panel, click Downloads (
 ) to display the Downloads page.
 - On the Downloads page, click Settings to display the Settings page.

- Under Environments, find the environment (for example, SAND_BOX) to configure the build-related properties.
- After you find the environment, click it to display all build-related properties:
- The following screen capture shows the build-related properties:
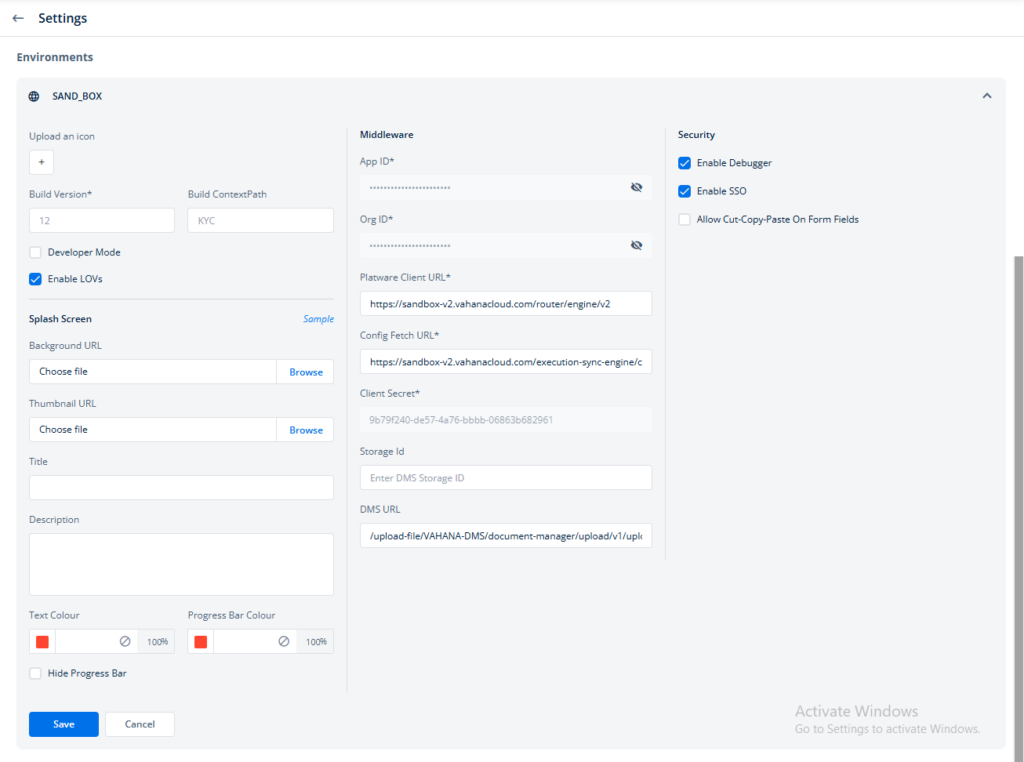
- Configure the build properties as follows:
Application Level Settings
| Application Level Settings | Description |
| Upload Icon ( | Click the plus icon to select the icon of the application from the local drive. |
| Build Version | This box automatically displays a default value, which is treated as the build version of the application. In this box, you must change the build version (for example, 1.0.0 or 1.0.1). You are always recommended to define and maintain the build version incrementally so that you can efficiently track different builds that you created for different purposes. It also helps you track the development (implementation) efforts on the application throughout the application development life-cycle. |
| Build Context Path | In this box, enter a value that is defined in the following format: Sample Value:- /AU-CASA This value is treated as the build context path. The build context path works as a unique identifier for the application designed in vFlow and the build of the application. Assume you create the build of a vFlow application thrice during a specific period. You can track and identify each of the builds by tracking the unique build context path. |
| Developer Mode | Click to select this check box if you are creating a build for the development and testing teams. Selecting the Developer Mode check box enables the debugger and other development and testing-related tools. |
| Enable LOV | On the Settings page, this property is automatically selected by default. The selected Enable LOV check box allows the end user to select a predefined value from a set of values in the dropdown list, check box, etc. |
| Splash Screen | This property allows you to define the image on the splash screen. When the user accesses the application, it loads the related screen with the splash image and its content. This property contains two sub properties as below: a. Background URL:- This property allows you to define the background of the splash image. Click Browse to select the background image or content. b. Thumbnail URL:- This property allows you to define the splash image. Click Browse to select the image. The application displays this image during initial loading before the application loads the splash screen. |
| Title | In this box, enter the build’s title (for example, AU_casa_testingteam). |
| Description | In this box, enter a brief description about the application and its build. Also, you can enter a brief reason to create the application’s build. |
| Text Color | In this box, define the build’s text color. To define the color of the build’s text: a. Click in the left section of the box to define the color. b. Click in the middle section of the box to define the color by entering the color’s hexadecimal value. c. The right section of the box becomes editable after you define the color. In this section, you can define the color’s transparency by entering the value in percentage (for example, 96). |
| Progress Bar Color | In this box, define the progress bar’s color. To define the progress bar’s color: a. Click in the left section of the box to define the color. b. Click in the middle section of the box to define the color by entering the color’s hexadecimal value. c. The right section of the box becomes editable after you define the color. In this section, you can define the color’s transparency by entering the value in percentage (for example, 96). The progress bar comes into view when you click the build to install the application. |
| Hide Progress Bar | Click this check box if you want to hide the progress bar when you install the application. |
Middleware Settings
| Middleware Settings | Description |
| Application ID | This box automatically displays the application ID of the current application. |
| Org ID | This box also automatically displays the workspace ID of the current workspace in which you are creating the application’s build. |
| Platware Client URL | <<To be discussed>> |
| Config Fetch URL | This box automatically displays the URL of the VRT environment. This URL points to the location that stores configuration details of the current application. After the end user accesses the application, the Data-On engine fetches the configuration details based on the Org ID and App ID from this location and then displays the application’s content to the user. Also, the integrated APIs fetch the application-related data from this location. |
| Client Secret | This box automatically displays a unique client secret ID in non-editable mode. It is used connect to the Vahana Run Time Manager. |
| Storage ID | In this box, enter the alphanumeric storage ID (for example, g8a0ef8f-ff1f-64a3-8d5b-2bda8aabc78b). The storage ID internally points to different AWS buckets (for example, S3 bucket, Oracle bucket) where you want to store the data. Note:- When you create the application build, you need to contact the Decimal Technologies’ DevOps team to get the storage ID. In the DMS bucket, you can store a variety of data such as, backup data, full dump, temporary data, migration-related data, data logs, and others. |
| DMS URL | This box automatically displays the URL of the DMS bucket. The DMS bucket (decimal-integrations) manages the stored data based on the Storage ID and DMS bucket name. Note:- You need to contact the Decimal Technologies’ DevOps team to get more details about DMS bucket. |
Security Settings
| Security Settings | Description |
| Enable Debugger | This check box is selected by default. The selected Enable Debugger check box means that you do not need to apply the debugger task while implementing several functionalities in the application. |
| Enable SSO | This check box is selected by default. Though the Vahana cloud provides the SSO (Single Sign-On) feature, the selected Enable SSO check box ensures that you do not need to log in to other modules again after you access the vFlow application. |
| Allow Cut-Copy-Paste On Form Fields | When you click to select this check box, the application allows the end user to perform the copy-paste function on the form fields. |
- After you configure application-related, middleware, and security settings, scroll down the Settings page to the end and then click Save to apply the build-related settings.
Loading Strategy
Loading strategies in vFlow define how application configuration data (pages, components, tasks, etcetera) is retrieved and cached on the client side. These strategies support performance optimization based on the application’s size, usage frequency, and offline needs. All configurations are stored as JSON and may be cached using browser storage mechanisms such as IndexedDB.
vFlow supports three primary loading strategies: Eager, Lazy, and Progressive, each with specific variants to address different application scenarios.
Supported Strategies
| Loading Strategy | Behavior | Caching / Client-Side Storage | Suitable App Size |
|---|---|---|---|
| Eager Loading | Fetches the entire app config at once, storing it in IndexedDB for future use. Suited for low-complexity apps where startup delay is acceptable. | Full config in IndexedDB | Small applications with minimal configuration size. |
| Lazy Loading (Browser Local Storage) | Retrieves page-level configuration only when a page is first accessed. The configuration is cached and reused on subsequent visits. | Page-level config in IndexedDB | Small to Medium sized apps where modular loading enhances performance. |
| Lazy Loading (Real-time Fetch) | Retrieves configuration data via API on every page visit without caching. | None | Large apps needing always up-to-date configurations. |
| Progressive Loading | Loads initial page configuration during app start. Additional configurations for linked or mapped pages are fetched in the background. All fetched data is cached for reuse. | Progressive page config in IndexedDB | Medium to large apps with linked user flows. |
Configuration and Storage
Caching:
- It is the process of storing data temporarily in a high-speed storage layer (called a cache) so that future requests for that data can be served faster. Instead of repeatedly fetching the same data from the original source (such as a remote server), the system retrieves it from the local cache, reducing load time and improving performance.
In web and application development, caching is commonly used to:- Minimize redundant API calls
- Reduce bandwidth usage
- Improve response times
- Enable offline functionality
- Caches can reside in various places — such as memory, disk, or browser storage (e.g., IndexedDB, localStorage). The caching strategy defines what data is cached, when it is cached, and how long it should be retained.
Storage Engine – IndexedDB:
- IndexedDB is a browser-supported database that stores data on the client’s device. It is designed for handling more complex data than what traditional storage options like
localStorageorsessionStoragecan support.- It is a high-capacity, client-side NoSQL database supported by all major browsers. It allows vFlow to store large and complex JSON configurations efficiently, unlike localStorage or sessionStorage, which have limited capacity and synchronous blocking APIs.
- Data is stored in a schema-less format using key-value pairs or object stores. It doesn’t require a rigid, predefined structure for the data it stores (unlike SQL databases where you define tables and data types strictly). Instead, you can store JavaScript objects directly, and each object can have a different structure.
Delta fetch:
- When a user performs a hard refresh or starts a new session, it updates only the changed parts of the app’s configuration. Instead of reloading everything, it fetches just what’s new from the server and updates the local cache. This keeps the app up to date without slowing it down.
Strategy Selection Guidelines
| App Type | Configuration Size | Recommended Strategy | Rationale |
|---|---|---|---|
| Static Info App | Small | Eager Loading | Full preload ensures fast navigation |
| Internal Tool | Medium | Lazy (Browser Local Storage) / Progressive | Loads only required modules; cached for reuse |
| CRM / ERP Systems | Large | Lazy (Real-time Fetch) | Loads fresh data, reducing startup cost |
Common Use Case
| Use Case | Recommended Strategy | Explanation |
|---|---|---|
| Fast initial startup | Eager Loading | Loads the full config once; zero delay after startup |
| Incremental loading | Lazy / Progressive | Loads only what is needed; improves modularity and responsiveness |
| Offline access support | Lazy (Browser Local Storage) | Uses browser cache for reuse |
| Ensuring latest data | Lazy (Real-time Fetch) | Config is fetched every time; ensures freshness |
| Avoiding stale configuration | All + Delta Fetch on Refresh | Updates only changed files without affecting cached experience |
Was this article helpful?
YesNo