
Minutes Dif From Now
The MinutesDifFromNow function calculates the number of minutes that have passed between the current time and a specified date-time value.
When to Use
- Real-time Validations: Use this function to handle logic based on recent actions (e.g., OTP expiry, inactivity timers).
- Timeout Management: Set up flows that expire or change behavior after a specific number of minutes.
- Security Control: Track session inactivity or sensitive action delays for better security handling.
Common Use Cases
- OTP Expiry Logic: Check if more than 3 minutes have passed since OTP was generated, and invalidate it if expired.
- Inactivity Timeout: Lock app screen or log out users after 10 minutes of inactivity.
- Wait Window for Edits: Allow changes to a submitted form only within 5 minutes of submission.
- Short-Term Eligibility Check: Trigger next steps only after a defined waiting period (e.g., a 15-minute cooling-off).
Concept
You will typically use the function within the Smart Selector, which has various function tabs. By typing “MINUTESDIFFROMNOW” in the search bar, you can select it and define its parameters.
Parameters:
| Datetime | This defines the source date from which the function will calculate the difference in years compared to the current date. You can enter: – A reference to an element (e.g., DatePicker_StartDate)– Or a JSON path to fetch a value from an entity (e.g., Insurance.policy[0].startDate) |
| Format | This specifies the format of the date being read. The function uses this to correctly parse the input date before calculating the difference. DD, MM, YY, HH, SS, DDD, MMM, YYYY, etc. |
Since this function can be applied across multiple scenarios, we’ll walk through one specific example below:
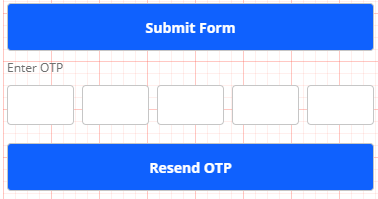
Scenario: Disable the “Resend OTP” button until 3 minutes have passed since the first OTP was sent.
Pre-Requisite:
| Element | Reference Name | Description |
| Button | Button__MinDiff_Submitfom | When the user clicks the Submit Form button, they get an OTP. |
| OTP | OTP_35176_MINSDIF | User inputs an OTP under ‘Enter OTP‘ that they receive on their device. |
| Button | Button_89473_MinsDiff | ‘Resend OTP‘ button to remain disabled for 3 mins after the last OTP sent. |
You have to do four steps:
- Create an Entity
- Create a Business Rule
- Create a Task Group
Create an Entity
Create a JSON entity (e.g. ‘MinutesDifFromNow‘) to store the time when the OTP was sent:
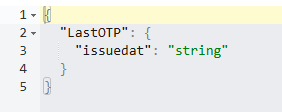
This entity will store the timestamp when Send OTP is clicked.
Create Business Rule
| – | Left Side | Operator | Right Side |
| Description | Select the MINUTESDIFFROMNOW function and define its parameters | Smaller than or Equal (<=) | Select the Static Function and define its parameter |
| Parameters | DateTime: issuedat attribute.Format: DD-MM-YYYY HH:mm:ss | CastTo: Number Value: 3 |
Create a Task Group
The task group defines what happens when the user performs certain action:
- Create a Task Group, e.g. MinsDiff
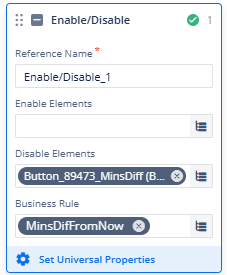
- Drag the Enable/Disable task to the execution box:
- Disable Elements: Select the Resend Button element that remains disabled for 3 minutes after the last OTP is generated upon clicking the Submit Form button.
- Business Rule: Select the Business Rule created above (e.g., MinsDifFromNow).
Suggestion: You can implement a Copy Data task on the onClick event of the Resend OTP button. This task should use the CURRENTDATETIME function to capture the exact time the button is clicked and copy it to the issuedAt attribute in the MinutesDifFromNow entity. This ensures that the 3-minute cooldown resets every time the Resend OTP button is used.
Link Element and Task
Linking the task to the element through an event is crucial.
- Select Submit Form (with reference name Button__MinDiff_Submitfom).
- On the bottom section of the right panel, locate Events (
 ).
). - In the event section (
 ), onClick event appears.
 - Click the plus sign (
 ) adjacent to onClick.
 - The event configuration opens. Drag the MinsDiff Task to the execution panel.
- Click the Save button located on the bottom right.
Note: You can also add a visible task on the onClick event of the Submit Form button if you want to keep the OTP element and Resend OTP button element invisible until the Submit Form button is clicked.
Result
Once implemented:
- When the user clicks the Submit Form button, the current timestamp is saved as
issuedAt. - The Resend OTP button remains disabled for 3 minutes after this timestamp.
- If the user does not enter the OTP within 3 minutes, the Resend OTP button becomes enabled automatically.
- If you follow the suggestion:
- If the user clicks the Resend OTP button, the timestamp (
issuedAt) is updated, and the button gets disabled again for another 3 minutes.
- If the user clicks the Resend OTP button, the timestamp (
Best Practices
- Use a consistent datetime format: Always use the same format (e.g.,
DD-MM-YYYY HH:mm:ss) when storing or comparing datetime values. - Handle repeated clicks gracefully: Prevent multiple rapid clicks on the Resend OTP button by immediately disabling it upon click.
- Keep entity names meaningful: Use intuitive names like
MinutesDifFromNoworOtpIssuedAtfor easier maintenance and readability. - Avoid hardcoded time values: If your application allows dynamic configuration, keep the “3-minute” threshold in a config entity or constant for easy future updates.
- Account for user inactivity: Optionally combine with session validation if the user remains idle beyond the threshold.
- Ensure visual feedback: Clearly indicate to users why the Resend OTP button is disabled (e.g., with a timer or message).