
Introduction To Task Groups
Tasks
Tasks are predefined actions used to perform specific operations within the application. These actions cover a wide range of functionality, such as:
- Authentication
- Navigation
- API interactions
- Element control: Enable/Disable, Show/Hide, Manage parent-child visibility
- Data handling: Group Copy, Copy to Clipboard, Add/Delete Object
- Styling: Apply custom styles
- Business logic: Execute Business Rules
- UI interactions: Popups, Custom Loading, Downloads (ZIP/Excel), Printing
- Utilities: WebView configuration, Multilingual handling, Logout, SSO token generation, Capture user location
Note: Tasks must be grouped into a Task Group in order to be executed.
Task Group
A Task Group is a container that holds one or more tasks and is linked to an event (such as onClick, onLoad, onSelect, or onBlur). When the event occurs, the associated Task Group is triggered, and its tasks are executed in the order they are stacked.
vFlow 2.0 features two types of Task Groups:
| Task Group Type | Description |
|---|---|
| Sequential | Executes tasks in a predefined sequence. |
| Conditional | Executes tasks based on logical branching defined using Business Rules. |
Conditional Task Groups let you create if–else–else-if rules to control what happens next based on different conditions. This way, the app can change its behavior automatically without needing any coding. The type of each Task Group is displayed in the Properties Panel after it is configured.
Creating and Configuring a task group
Creating a Task Group
There are two ways to go about creating a task group:
1st Way: Through Configurator
Tasks can be assigned to all entities necessary for completing the application, including pages, components, and elements. As application development progresses, tasks can be applied at each level—page, component, or element—based on the desired context and functionality.
Let’s apply it on the page through the configurator.
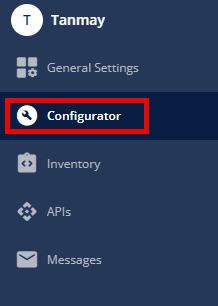
- Once you are on the vFlow 2.0 dashboard, click the application to open vFlow or click
 .
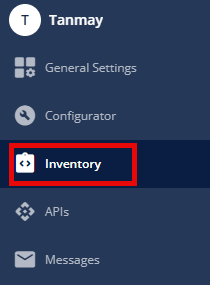
. - Open the Configurator from the expandable menu located on the left.
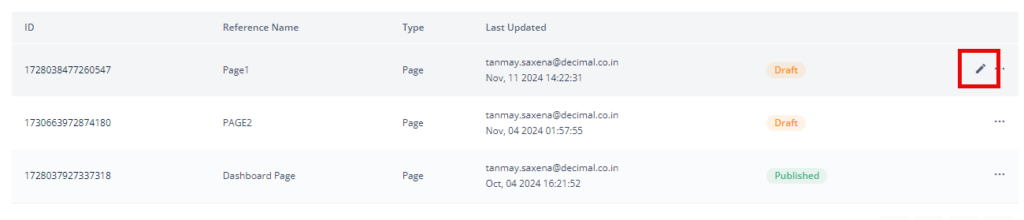
- Click +Create (
 ) located on the top to make a new page or open a pre-existing page by clicking on the pencil icon (
 ).
).
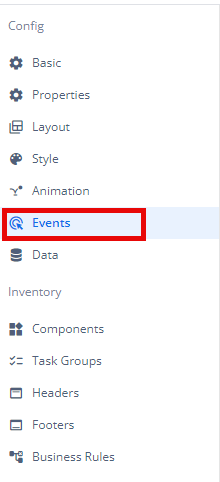
- As Page Config opens, Click Events from the config menu located on the left of the screen.
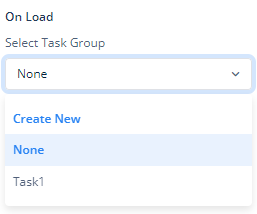
- On the Events page, select the task group from the dropdown or create a new one.
Similarly, task groups can be implemented in the components and elements through the ‘Events’ option of their configurator menu.
To learn about configuring the new task group, click here.
2nd Way: Through Inventory
- Once you are on the vFlow 2.0 dashboard, click the application to open vFlow or click .
- Open the Configurator from the expandable menu located on the left.
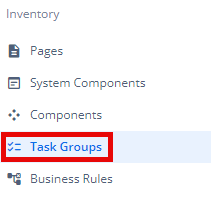
- Open the Task Groups section form the Inventory menu located on the left.
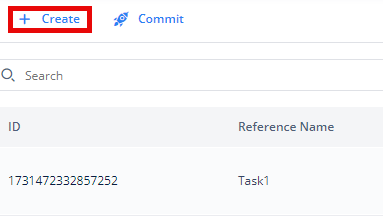
- Click +Create located on the top to create a new task group.
Now, follow the steps given below to configure a task group.
Configuring the task group
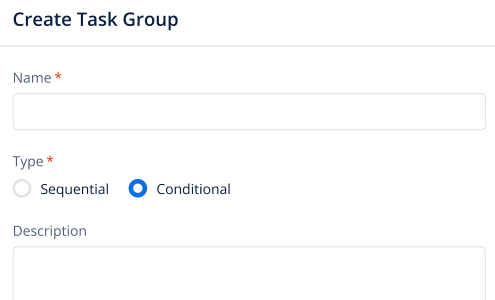
When a new task group is created, a create task group dialog box pops up in which you define the Task Group’s Name, Type, and Description. You can select the task group type from Sequential and Conditional types, based on your requirement as explained above. Let’s understand the configuration in both cases:
Case A. When you select the Sequential task group type, you have to configure the following:
- Basic Properties
| Properties | Description |
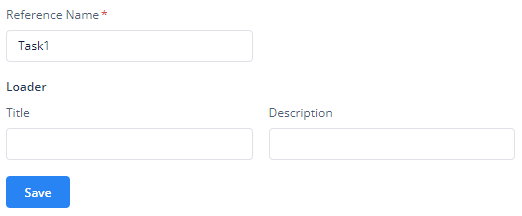
| Reference Name | The Reference Name is a unique identifier assigned to the task group for internal use. This name is visible only to vFlow users and is not displayed to end users. The Reference Name is intended for your convenience, helping you easily identify and manage the task group throughout. |
| Title | When a user executes a task, it may take a few seconds to load. During this time, you can display a title indicating what is being executed. |
| Description | The Description field is intended for use by application designers or administrators (vFlow users) to provide additional context or details about the task group. This description is not visible to end-users and is used solely for internal reference to assist with task management. |
- After defining the basic properties, click Tasks.
- Then click + Create at the top and start adding tasks.
- Order of Execution & Changing Sequence:
- Make sure the order of tasks is per your desired order of execution as tasks are executed in the order they appear.
- Once it has two or more tasks, the “Change Sequence” option becomes available.
- On clicking “Change Sequence,” tasks can be reordered using drag-and-drop.
- During reordering, the “Save Sequence” and “Cancel” buttons will appear.
- IMPORTANT:
- In the Reference section, you can see where the task group is mapped.
- After creating a task group, ensure it is mapped to the Events section of the relevant page, component, or element.
Case B. When you select the Conditional task group type, you have to configure the following:
- The Basic Properties and Reference section will remain the same as in the Sequential type task group.
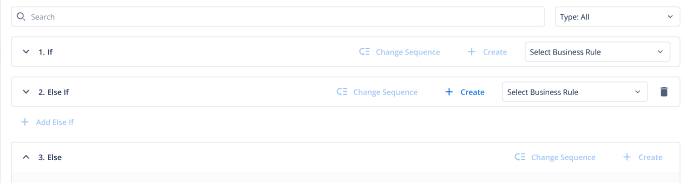
- In the Conditions section, a block-based layout appears with collapsible sections for:
- If: If its BR condition is true, the tasks under the If block are executed, and the rest are skipped.
- Else If (optional, multiple allowed): If the condition under If-Block turns out false, then each Else If block is checked in the same order they are. The tasks under the first block with a true BR condition get executed; others are ignored.
- Else (optional): If no BR conditions are met, the Else block (if present) is executed.
Each block is visually represented to help you organize your logic clearly.
- Configuring Each Block:
- BR Mapping
- For If and Else If blocks, mapping a Business Rule (BR) is mandatory.
- Until a Business Rule is mapped, the “+Create” button to add tasks remains disabled.
- You can map an existing Business Rule from the dropdown or click “Create Business Rule” to define a new one. Once selected, the BR is auto-mapped to the block.
- Task Creation
- After a BR is mapped, you can add tasks inside that block using the “Create Task” button.
- You can add multiple tasks inside each block.
- Tasks are executed in the order they appear.
- Changing Task Sequence
- Once a block has two or more tasks, the “Change Sequence” option becomes available.
- On clicking “Change Sequence,” tasks can be reordered using drag-and-drop.
- During reordering, the “Save Sequence” and “Cancel” buttons will appear.
- While this operation is active, the BR Mapping and Create buttons are temporarily disabled.
- Managing Else If Blocks
- You can add multiple Else If blocks using the Add Else If button.
- Each new block is automatically labeled (e.g., Else If 1, Else If 2).
- You can delete an Else If block using the delete icon, which triggers a confirmation popup before deletion.
- Task Management:
- Each task in a block includes a three-dot menu with a Delete option.
- Deleting a task triggers a confirmation popup.
- BR Mapping
- Validation Rules:
- BR Mapping is mandatory for If and Else If blocks. Attempting to save without mapping a BR will trigger an error: “Please map BR for if or else if blocks to save the configuration.” Moreover, Affected fields are also highlighted.
- Else and Else If Restrictions
- The Else block’s Create button is disabled until the If block has a BR mapped.
- The Add Else If button is also disabled until the If block’s BR is set.
- Empty Task Warning
- If any block has a mapped BR but no tasks, a warning popup appears on save: “Some blocks have no tasks added. Do you still want to proceed?”
Now let’s understand each task, its usage, and its configuration.