
Data
Introduction to Data
In the vFlow module, Data is mechanism that you can use for the following purposes:
- Fetching data from the data source and display in the application
- Validating data
- Capturing data from the application page and store in the data path.
To fetch, store, or validate the data at the application level, you can use one of the following data binding mechanisms:
- Static
- Path
- API
- URL
- Enum (Enumeration or LOVs)
vFlow 2.0 incorporates the Data module as a separate functional layer. You can access the Data module in the Configurator menu. In vFlow 2.0, the Data mechanism is independent of any entity or component. It helps you manage data in the data source without using a full-fledged relational database system. You can bind these data sources to an element or entity based on the application-related requirements.
From a single page, you can configure one of the data mechanisms to manipulate the data. vFlow 2.0 offers handful and easy configurable properties to configure a data mechanism.
Accessing Data Feature
- On the vFlow 2.0 module’s dashboard, see the left navigation panel.
- In the left navigation panel, click the Configurator icon (
 ), and the middle panel displays the list of different pages.
 - In the list of pages, find the page where you want to configure the data source.
- After you find the page, move to the right in the same row, and then click the Edit icon (
 ) to the left of the three-dots icon.
 - Click the Edit icon (), and the middle panel displays the <<Page Name>> page (for example, the Data Submission page).
- On the Data Submission page, under Config, click Data, and the middle panel displays the Data Type list.
- Click the Data Type list and then select one of the following data binding mechanisms:
Static
The “Static” data source contains a dummy code. You can use this dummy code for the testing purpose. When you test the dummy code, you ensure that the dummy code is implemented correctly. In multiple scenarios, the application developer uses the dummy code to test the component and observe how the component will look after the data is added to it.
Note:- In the dummy code, the data must be in string format.
To use the Static data mechanism:
- On the Data Page, click the Data Type list and then select Static, and the JSON box comes into view.
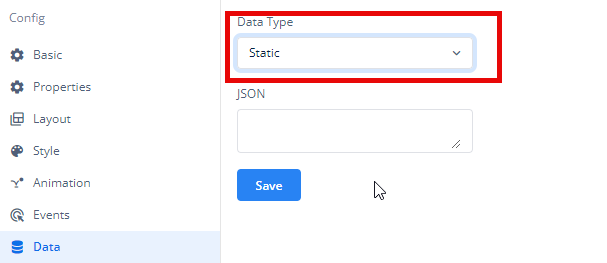
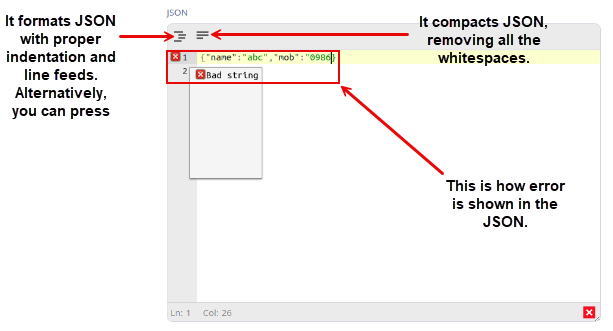
- In the JSON box, enter the dummy code, as shown in the following screen capture:
[{“name”: “Ashi”, “company”: “Decimal”, “designation”: “software engineer”}, {“name”: “Varsha”, “company”: “Decimal”, “designation”: “software engineer”}, {“name”: “Nikunj”, “company”: “Decimal”, “designation”: “Senior software engineer”}]
- After you enter the dummy code, click
 to configure the “Static” data source.
Note:- You cannot add the data source to the FieldSet component. To add the data source to the FieldSet component, you need to add the data source to the Form component.
Path
The “Path” data mechanism uses the reflection technique to create instances of business objects. This technique allows it to dynamically invoke methods for performing update, retrieve, insert, and delete operations. You need to choose the “Path” data mechanism if the data object contains the data. The Path data mechanism is used to fetch the data from the master object by using the getVal() function.
The following code is the sample JSON structure to define a temporary data path:
{
tempObject:{
data:{id:1,name: “abc”}
},
P101:[{status:active}]
}
Use the following statement to get the data from the JSON structure:
getVal(‘tempObject.data’) or getVal(‘p101’)
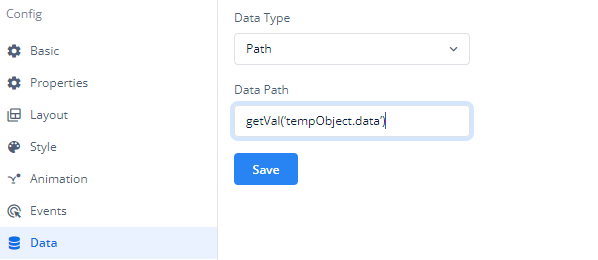
If you see the sample JSON structure before the above screen capture, you can see that the tempObject object contains data in key-value pair format. The application executes the getVal() function to fetch the value of the Name key.
Thus, click![]() to configure the “Path” data source.
to configure the “Path” data source.
API
You can use this mechanism when you want to get the data from an API. The API is configured on the vConnect module. To know more about the API configuration, you can visit vConnect posts under Integration tree on the Vahana Academy portal.
To configure the data binding by using the API mechanism:
- On the Data Page, click the Data Type list and then select API, and the following fields come into view.

- When you want to configure the data binding by using the API mechanism, you need to provide the following information:
| Field Name | Description |
| Service Name | Click the Service Name, and it displays the list of configured services. In the list, select the service that you want to configure. The Service Name list displays the list of services that have been previously configured on the vConnect module. |
| Success | In this field, Select a pre-defined text message. The application will display this message after the API returns the success response. Click here to learn how to create messages. |
| Failure | In this field, enter a pre-defined text message. The application will display this message after API returns failure response. Click here to learn how to create messages. |
- Then click to configure the API data mechanism.
URL
You can use the URL data mechanism to get the data from a URL. By using the URL data mechanism, you can only issue the GET request. To configure the URL, you need to use the HTTP and HTTPS protocol schemes. After the application sends the request to the configured URL, it gets the required data from the server.
To configure the URL data source:
- On the Data Submission page, under Config, click Data, and the middle panel displays the Data Type list.
- Click the Data Type list and then select URL to display the following boxes:
- Source URL
- Data Path
- In these boxes, enter the details as follows:
| Boxes | Description |
| Source URL | In this box, enter the URL string. The application will post the request to this URL to get the data. |
| Data Path | In this box, define the data path. When an API returns the response, it stores this response in the data path. Assume, you define a data path as follows: getVal(‘tempObject.componentData’) When an API returns the response, it stores the response in the tempObject JSON object. |
| Request | When you configure a data source by using the URL mechanism, this tab is selected by default. Under this tab, you can define the request parameters. The request is generated from the front-end application after the user performs a function on the application. To configure request parameters: a. In the Request tab, click Add, and the Key and Value fields come into view. b. In the Key field, enter the parameter’s name (for example, Name). c. In the Value field, enter the parameter’s value (for example, John). d. Click Add to add another set of the Key and Value fields. e. Repeat steps b and c to define the new parameter’s name and value.  |
| Response | When you click the Response tab, the middle panel displays properties related to the API response. You can use these properties to configure the API’s response. You can configure these properties as follows: a. Name:- Click this list, and then select the API to configure its response. b. Data Path:- In this box, define the object (for example, getVal(‘Data‘) that will store the response that the API returns to the application. The API will store the response in the Data parameter. c. Success Key Path:- In this box, define the object (for example, getVal(‘Status‘) that will store the success key (status code) that the API returns after the successful job. d. Success Value:- In this box, define the boolean value (for example, true or false) that the API will return with the response. e. Message Path:- In this box, define the object (for example, getVal(‘Msg’) that will store the response message that the API returns with the response. 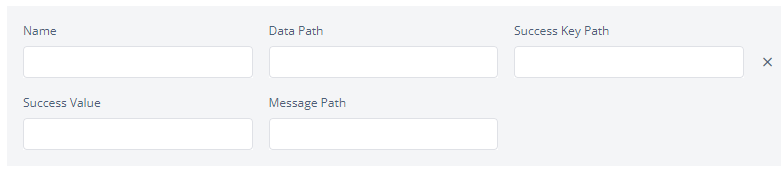 |
- After you configure the required properties, click to configure the URL data mechanism.
Enum (Enumeration or LOVs)
The Enum (Enumeration or List of Values) mechanism allows you to define and bind a list of predefined values to elements or entities in your application. This mechanism is particularly useful for dropdowns, radio buttons, or any element requiring a fixed set of selectable options.
Creating and Using Enum
- Creating an Enum:
- You can create Enum definitions using the Data Modeler in vFlow 2.0.
- To learn how to create Enum, click here.
- Binding Enum to Entities:
- Once the Enum is created, navigate to the Data section of the entity configuration.
- Select the Enum option and choose the appropriate Enum definition or name from the list.
- This binds the predefined values of the Enum to the corresponding entity.