An Introduction to vFlow 2.0 Configurator Menu
Familiarity with the vFlow menu options and their functionalities is crucial for efficiently designing and developing advanced software applications by using vFlow.
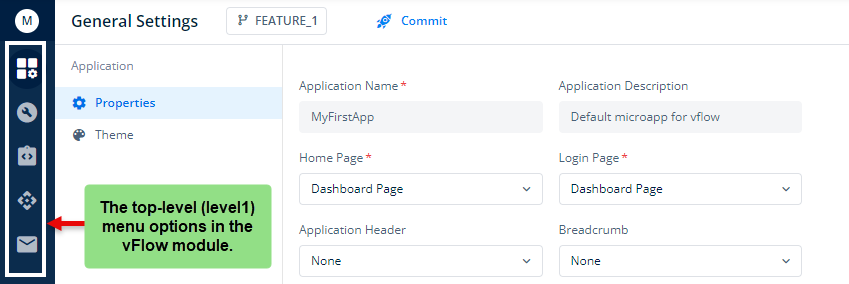
You can find these top-level (level 1) menu options in the left navigation panel. They not only align your implementation efforts with the business requirements but also empower you to impart cosmetic design standards and UI capabilities to the application.
The level 1 menu options contain multiple components and properties. You can configure these components and properties to design a variety of custom business applications. The most important feature of the vFlow level 1 menu options is that they help you smartly separate the design concern from the implementation aspect of the application.
Throughout the application development life-cycle, you can design the application layout separately and then impart the functional behavior to the application’s pages by configuring events, task groups, and tasks, and integrating APIs and back-end services.
Now let’s understand these menu options as follows:
| Menu Options | Description |
| General Settings ( | General Settings is an option that allows you to configure the theme and properties of your application. These sections are briefly described as follows: 1. Under Properties, you can configure basic properties of the application, such as Application Name, Application Description, Home Page, Login Page, Application Header, Breadcrumb, Push Notification, System Message Position, and Application Loader. 2. Under Theme, you can define a visual pattern or a set of patterns that impart a look and feel to user interfaces in the application. |
| Configurator ( | Configurator is the option that you can use to configure your application from scratch. By using this option, you can build your pages and define their properties, layouts, and styles separately. After designing the application page, you can add animations and configure events to impart behavior to the application. This streamlined approach allows you to develop each page of your application cohesively, integrating all necessary items without needing to create and map them separately. Under Configurator, the Inventory section displays the list of different components, task groups, and other items that you added to the current page. |
| Inventory ( | The Inventory option displays the list of all items that you added to the application. You can see the list of different items under the following categories: a. Page b. System Components c. Components d. Task Groups e. Business Rules Apart from seeing the list of different items, each category allows you to create a new related item. For instance:- Under the Task Groups category, you can create a new task group. 1. Under Pages, you can create a page, see the list of earlier added pages, and configure different properties of a page. 2. Under System Components, you can create system components, such as breadcrumb, app header, header, and footer. You can also see the list of earlier-created system components. 3. Under Components, you can create a component and see the list of existing components on the current page. You can create components, suh as Form, Card, List, Table, Fieldset, and others. 4. Under Task Groups, you can build a new task group. A task group is a logical container. In the task group, you can add and configure multiple tasks. To impart functional behavior to the page, the task group is mapped to an element. Apart from building a task group, you can see the list of earlier-created task groups. 5. Under Business Rules, you can create a business rule and see the list of earlier-created business rules. A business rule contains a condition. If a user’s action or the application’s workflow satisfies the condition in the business rule, the application performs a specific function. Note:- In the Inventory menu option, you can create items separately before mapping them to a page. In the Configurator menu option, you cannot create components directly within the Inventory section of the page. |
| APIs ( | Under the APIs option, you can configure an API by defining the request and response parameters for exchanging data between the front-end application and server. |
| Messages ( | By using this menu option, you can create messages that you want to display on application pages. You can configure a message related to multiple scenarios, such as the success or failure of a task’s execution, a business rule, or data retrieval. These messages will appear in a snackbar at the bottom-center of the page. |
How to Access vFlow 2.0 Level 1 Menus
You can access vFlow level1 menu options as follows:
- On the vFlow module’s home page, see the left navigation panel.
- In the left navigation panel, you can see the top-level menu options as shown in the following screen capture: