App Setting
The App Setting option is crucial as it not only provides key information like the application owner, creator, your role, and the application creation date, but most importantly, it allows you to connect your vFlow application to the middleware if this step was skipped during application creation. This connection is essential for unlocking the full functionality of your application, enabling integrations such as API connections and real-time data transfer. Additionally, it offers options to duplicate or delete the application, serving as a central hub for managing the application’s lifecycle.

Connect the application to the Middleware
To fully unlock the potential of your vFlow application and avoid having it function as a mere dummy application, you must connect it to the middleware. This connection allows your application to access all its intended features, including API integrations and real-time data handling. Follow these steps to connect the application to the middleware:
Step A. Create a Middleware Application
Vahana Portal Dashboard
- Open the Vahana Portal Dashboard using the link: https://console.vahanacloud.com/
Creating an application
- On the Vahana portal’s dashboard, click “Create Application” located on the right of the screen in the Recent Application section.

- Hover over the left navigation panel to expand it. Under “My Vahana,” click “Applications,” and the Applications page will open. After that click “Create Application (
 )” located on the top-left.

Follow the steps and fill in the information
- On first step, choose the type of your application as Middleware.

- On the subsequent page, fill out a list of basic details:
| List | Description |
| Upload or Choose Icon | Click the plus icon (+) to upload the image for the application’s icon or select one of the available icons ( ). ). |
| Name | In this box, enter the application’s name (for example, Middleware1). |
| Tags | In this box, enter an alphanumeric value (for example, first, app, and first_app1). This value is treated as a tag or identifier that helps you search for the current application in a group of multiple applications. |
| Description | In this box, enter a general description or a reason to create the current application. |
You can submit (![]() ) it to complete your middleware application creation process.
) it to complete your middleware application creation process.
Step B. Linking the vFlow Application with the Middleware.
- Access the vFlow Application from the Vahana Portal Dashbaord.
- As the application dashboard opens, hover over the panel on the left of the screen to expand it and click the App Setting option again.
- Upon opening the App Setting, see the middleware option.

- Click +Connect

- As you click connect, a dialog box named “Connect Middleware” opens.

- Select the ‘Workspace Name‘, the workspace in which you created your middleware application.
- Select the ‘Application Name‘, the name of the middleware application that has been created following Step A.
- Then click the Request (
 ) button to send the request to the middleware application you want for your vFlow application to connect to.
 - After that, when you click the middleware option, the ‘Connection Pending‘ status is shown until the request is accepted from the middleware application. This is how it looks:

- You can always edit (
 ) it before the request gets accepted or even delete it by clicking three horizontal dots
  .
.
- Once the request gets accepted, the ‘Connected‘ status is shown, and you can always unlink or disconnect it.

Step C. Accepting the connection request on the Middleware Application.
Vahana Portal Dashboard
- Open the Vahana Portal Dashboard using the link: https://console.vahanacloud.com/
Access the Middleware Application
- Find your middleware application under the “Recent Applications” section.

- Alternatively, by hovering over the left panel, you’ll see the “Applications” option, which, when clicked, opens a page listing all applications created in the selected workspace.
Note:- If you do not find the application in the Recent Applications area, click View app apps to search and find the application.

Approving The Connection Request
- Once the Middleware Application is found, click to open it.
- Upon opening the application, you see the Middleware Application Dashboard.

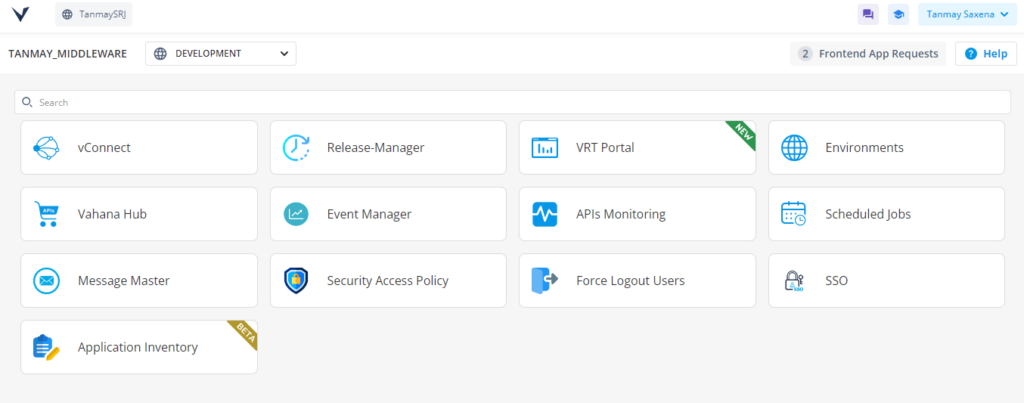
- On the Middleware Application Dashboard, Click ‘Frontend App Requests‘ located on the top right corner of the page.

Note: The number displayed alongside the ‘Frontend App Requests‘ button indicates the total number of connection requests received from other Vahana applications (vFlow applications in this context). This feature is essential for tracking and orchestrating incoming integration or communication requests across different applications within the Vahana ecosystem, ensuring smooth collaboration and data exchange.
- As you click the ‘Frontend App Requests‘ button, a ‘Frontend App Requests‘ dialog box opens, containing all the pending requests.

- Hovering over any one of them will display the ‘Accept‘ and ‘Reject‘ buttons.

- Accept the request for the application you want your middleware application to get connected to.
Hurrah! Your vFlow application is now successfully connected to the middleware, unlocking its full potential and enabling advanced features.
