
Configuring Vahana Run Time
Introduction
VRT, which is also named Vahana Run Time, works as a runtime environment where a front-end application or a backend service runs. You can run an application or execute a back-end service to test and monitor its performance, or an application can also runs in the production environment.
When you access the Environments module for the first time through the middleware application, it provides a default environment, SAND_BOX, and a default VRT with the same name, SAND_BOX. The SAND_BOX environment is automatically mapped to the SAND_BOX VRT.
Apart from the default SAND_BOX VRT, you can create a custom VRT. If you create a new VRT (for example, demo_VRT), you need to map it to the default SAND_BOX environment, or you can also create a custom environment and then map the new VRT to the new custom environment.
The mapping between an environment and a VRT allows you to run the applications and services in the mapped VRT.
That is how you can map a VRT to multiple environments so that you run and test applications or backend services in the mapped VRT. Also, a production-type environment is mapped to a VRT so that the application’s production version can run in the mapped VRT.
If you plan to work with the custom environment and VRT, you are recommended to create a VRT before you create an environment. The reason for this recommendation is because when you create an environment, the Environment module asks you to select a VRT. When you select the VRT, you map the selected VRT to the newly created environment. You can create and configure a VRT as follows:
To configure Vahana run time:
- On the Vahana dashboard, find the VRTs (Vahana Run Time) tab.
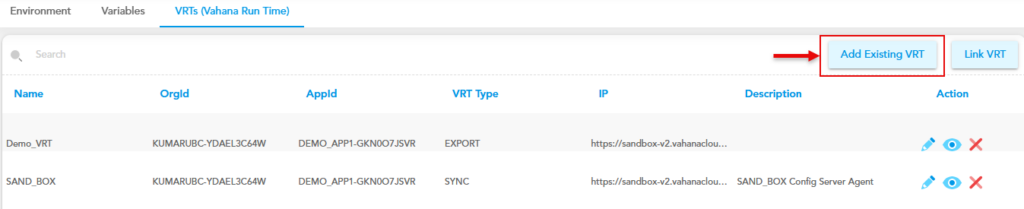
- Click the VRTs (Vahana Run Time) tab, and then click Add Existing VRT to display the Create VRT dialog box.
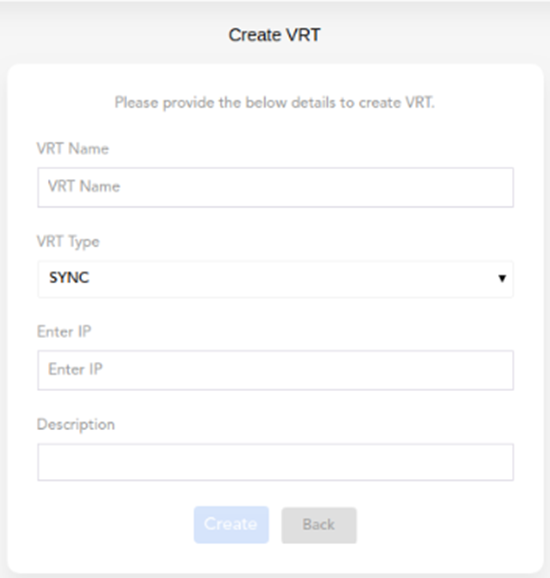
- In the Create VRT dialog box, enter or select values as follows:
| Box/List | Description |
| VRT Name | In this box, enter the name for a new VRT (for example, UAT1). |
| VRT Type | Click this list to select one of the following options: PROD:- Select this option to deploy the application in the production environment. NON-PROD:- Select this option to deploy the application in the non-production environment, such as dev, UAT, and other custom environments. |
| Deployment Mode | Click this list to select one of the following values: 1. SYNC:- Select this value if you want to deploy the application’s configuration details with the following options:- a. Immediate:- If you select this option, it deploys configuration details on VRT and also stores them in the VRT-incorporated database. b.Staging:- If you select this option, it stores configuration details in the VRT-incorporated database but does not deploy them on VRT. To deploy the configuration details on VRT, you need to manually export them to the VRT in the Deployment Manager module. 2. EXPORT:- If you select this option, the deployment process stages the configuration details in the Vahana cloud by storing them in the database. Thus, you need to manually export or deploy the configuration details to the VRT in the Deployment Manager module. 3. MULTIPART:- If you select this option, it deploys configuration details in zipped file format through the secured HTTP request. With the MULTIPART deployment mode, you can bypass the security layer of the client application environment. |
| Enter IP | In this box, enter the web location/IP address where you want to host the newly created environment. |
| Description | In this box, enter a brief reason to create the VRT. |
- After you enter or select values in the related boxes, click Create to create a new VRT.

Viewing Details of VRT
You can view the details of newly created and existing VRT(s) on the Vahana dashboard. By viewing the configuration details of VRT, you can observe VRT configuration and then modify the current configuration details as per requirement.
To view the details of VRT:
- On the Vahana dashboard, find the VRTs (Vahana Run Time) tab.
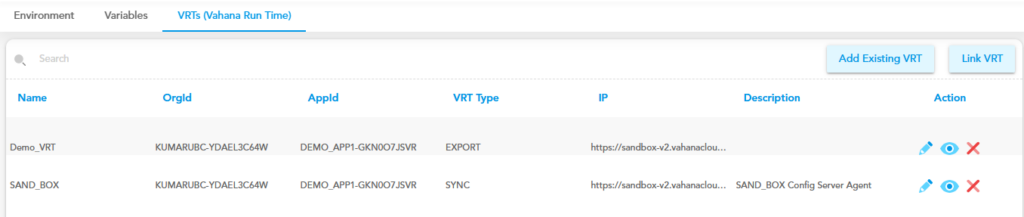
- Click the VRTs (Vahana Run Time) tab to display the list of existing VRT(s).
- The record of a specific VRT contains the following:
| Column | Description |
| Name | This column displays the name of VRT. |
| Orgid | This column displays the unique Org ID of the middleware application that you create on the Vahana cloud. The Vahana cloud maintains this Org ID on the middleware portal. |
| Appid | This column displays the unique app ID of the middleware application. You create the VRT under this middleware application. |
| VRT Type | This column displays one of the following values: a. SYNC:- This value specifies that the VRT is configured to sync the application configuration and back-end services in other environments. b. EXPORT:- This value specifies that the VRT is configured to export the environment variables to to other environments. c. MULTIPART:- This value specifies that the VRT is configured as a MULTIPART VRT type. The MULTIPART VRT type allows you to sync enriched media, regular expressions, and operators with the other configuration details. |
| IP | This column displays the location where the environment is hosted. |
| Description | This column displays the brief description of the VRT. |
| Action | This column displays three icons, which are described as below: a). ( b). ( c). ( |
Monitoring Different VRT Versions
The Environments module allows you to view different versions of VRT. It creates different versions of VRT as a result of the deployment of the application’s configuration details. You can access different versions of a VRT to make sure the VRT details are updated as expected.
You can compare the old version and new version of the VRT to confirm the availability of new feature. You can find the new feature in the new VRT version.
To monitor different versions of VRT:
- In the VRT (Vahana Run Time) tab, see the list of different VRTs.
- In the list, under the Name column, find a VRT.
- After you find the VRT, move in the same row to see the eye icon (
 ) under the Action column.
 - Click the eye icon () to display the updated list of different versions of the VRT.
In the list, you can check newer versions of the VRT to find new features incorporated in the application. If the right panel does not display the list of different VRT’s, it displays the Import Details button.
After you click the Import Details button, it fetches the last updated list of the VRT versions.