
Open Camera
This post is referring to Vahana 2 (beta version). To check the document for production, please go to vDesigner-v1.0
When this task executes, it opens a camera to capture the media. This task can be implemented in those apps where the user needs to capture the media (image or video) frequently.
Steps to Configure
- On the <<task group’s name>> page, see the Task panel.
- In the Task panel, search and find the Open Camera task.
- Drag the Open Camera task from the Task panel to the Execution panel.
- Under Open Camera, a group of boxes comes into view.
- In the boxes, configure related properties as follows:
| List/Box | Description | Mandatory |
| Reference Name | In this box, enter the name of the task. Also, the system generates a reference name by default that you can change. | Yes |
| Camera Mode | Click this list and then select any of the following camera mode: –> Take Picture:- This option allows you to capture the image of the object. –> Take Video:- This option allows you to record the video of the object. | No |
| Default Mode | Click this list and then select any of the following modes of the camera’s direction: –> Front Camera:- This option activates the front camera of the device. –> Back Camera:- This option activates the back camera of the device. | No |
| Camera Resolution | Click this list to select any of the following resolutions for the captured media (Image or video): –> Low –> Medium –> High –> HD –> Ultra HD | No |
| Doc Type | In this box, you define the type of media. The user can capture the video of that media type. You can define the media type by using the following ways: 1. By using Static function:- You can use the Static function when you want to define a static value (for example, Aadhar) manually. To use the Static function: a. Click in the Doc Type list to expand the smart selector. b. In the Search box, enter Static to display the Static function. 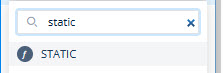 c. In the smart selector, select the Static function to display its format. d. In the Static function, click the second parameter to display the list of available data types. e. In the list, select String. f. In the Static function, click the first parameter and then write the name of doc type (for example:- aadhaar) at its place as follows: 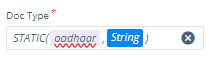 2. By selecting entity:- a. Click in the Doc Type list to expand the smart selector. b. In the Search box, enter the entity’s name, and a smart selector expands. c. In the smart selector, select the name of entity. 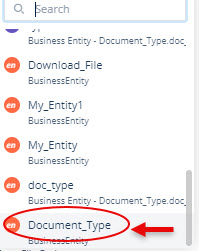 | Yes |
| Doc ID | In this box, enter a unique ID (For example:- aadhr_id). The application uses this unique Doc ID to manage multiple media files of a single document at the DMS (Document Management Server) level. Later, the application uses the same unique Doc ID to fetch the records of the media files from the database. | Yes |
| Doc Bundle ID | In this box, define a key. This key is referred to as the Doc Bundle ID. The Doc Bundle ID is used to group the documents on the Document Management Server. You can define the doc bundle ID by using the following methods: a. By using Static function b. By selecting entity Note:- How to use these methods is broadly described in the description of the Doc Type property. | Yes |
| Primary Key1 | In this box, define a unique key that is called the Primary Identification Key. This unique key is used to upload the request to the document management server. You can define the primary identification key by using the following methods: a. By using Static function b. By selecting entity Note:- How to use these methods is broadly described in the description of the Doc Type property. | |
| Primary Key2 | Read the description of Primary Key1. | |
| Primary Key3 | Read the description of Primary Key1. | |
| Base File Path | In this box, enter the path to a storage location where the application will store the media in the app storage after the “Open Camera” task captures the media. | No |
| File Prefix Name | In this box, enter a prefix name. This prefix is automatically prefixed to the name of the media file when it is saved to the intended location. | No |
| Min File Allowed | In this box, enter a numeric value (for example, 1). This numeric value specifies a minimum limit to capture the media of an object before saving it locally. | |
| Upon Minimum Limit Reach | This property automatically opens the camera in preview mode after the user captures the media until the minimum limit. After the camera opens in preview mode, it allows the user to upload the media to the server. Also, the user can delete the captured media or return to the camera to capture another media. | |
| Do you want to upload on DMS Server | By default, this check box is clear. When you click this check box, the app will allow the user to upload the media to the DMS server. | |
| Delete | When you click this check box, the app allows you to delete the media in preview mode. After you delete the media, it is deleted from the local drive and DMS server. | |
| Max File Allowed | In this box, enter a numeric value (for example, 5). This numeric value specifies a maximum permissible limit to capture the media of an object. | No |
| Max File Size | In this box, enter the maximum permissible size of a media file that the end-user can locally save. | No |
| Duration of The Video (Ss) | In this box, enter the maximum duration to capture the video. The user cannot capture the video beyond this timeframe. | No |
| Base 64 | Click this check box to activate the feature that captures the media with the base-64 format. | No |
| Upload Media | If you click this check box, the application calls the Upload Media API to upload the media to the Document Management server. When the Upload Media API is called, it accepts the multipart request, in addition to the media data. The media includes JPEG, PNG, GIF, PDF, DOC, DOCX, MP3, MP4, WAV, and others. | No |
| Delete Media | If you click this check box, the application calls the Delete Media API to delete the media from the Document Management server. | No |
| Crop | Click this check box to activate the crop feature. | No |
| Crop Type | This property comes into view after you click the Crop check box to select it. This property contains the following tabs: 1. Auto:- When you click this tab, the app displays the crop box with the pre-defined size. 2. Manual:- When you click this tab, the Box Width box and Box Height box come into view. In the Box Width box, enter the width of the crop box. In the Box Height box, enter the height of the crop box. The Manual tab allows you to define the width and height of the crop box manually. | No |
| Watermark | Click this check box to activate the watermark feature. This feature displays the watermark on the captured media. Click here to read about watermark configurations in detail. | No |
| Output Location | In this box, you can configure the location to store the captured media at the database level. After the “Open Camera” task captures the media (image or video), the captured media file is automatically saved to the configured JSON-based location in a specific data source. To configure the location: –> In the Output Location box, click the application tree icon ( –> In the Output Location area, click the Source list and then select a data source (For example:- Data Store). –> After you select a data source, the right panel displays the tree of the JSON-based locations in the data source. –> In the tree, select a location to store the captured media file. –> After you select the location, click Select, and the output location is successfully configured. 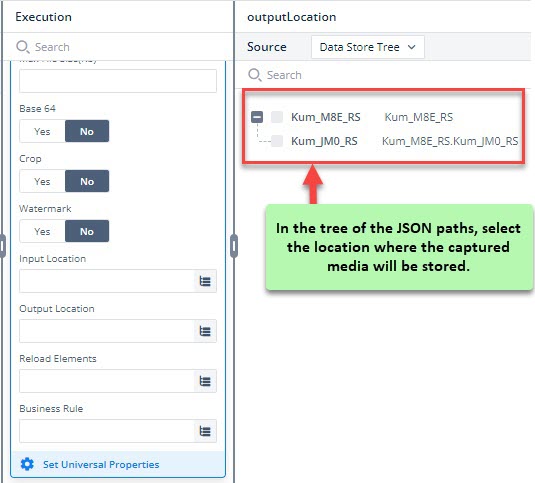 | No |
| Reload Elements | In this box, configure the elements that the application will reload after the “Open Camera” task captures the media. To configure the elements: –> In the Reload Elements box, click the application tree icon ( –> In the Reload Elements area, see the application tree. 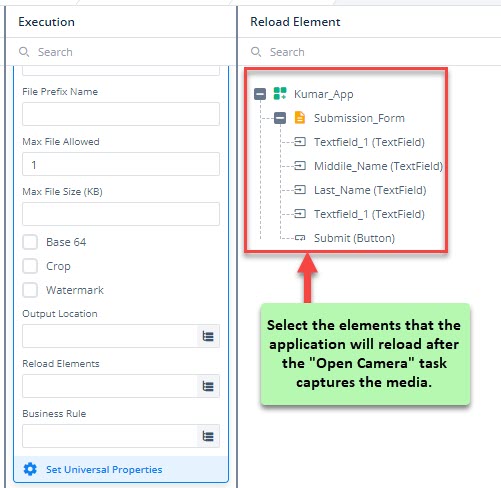 –> In the application tree, select the elements that the application will reload. –> After you select one or more elements, click Select, and the elements are successfully configured. | No |
| Business Rule | In this box, you can configure a business rule to determine the execution of the Open Camera task. If the user’s action satisfies the condition in the business rule, the Open Camera task is executed. To configure the business rule: –> In the Business Rule box, click the application tree icon ( –> In the Business Rule panel, click Create New to configure a new business rule. | No |
- After you configure the related properties, click Save to configure the Open Camera task.
Was this article helpful?
YesNo