An Introduction to Vahana Cloud
Introduction
Vahana Cloud is a no-code application platform where you can develop enterprise-level omnichannel applications. Unlike traditional development environment where several activities are dependent on the resources, Vahana enables you to efficiently perform development-related activities only with the basic knowledge. Overall, Vahana lets you build your application or solution in an optimized time frame as compared to the standard approach and also makes it easy to maintain by following industry standards in design, development, and security. All these benefits are cost-effective when you compare them to the currently practiced traditional software development processes.
Vahana contains four core modules and other supporting modules to build an E2E enterprise-level application. These core modules are:
- Design
- Integration
- Deploy
- Monitor
User Onboarding on Vahana (Signup and Login)
Vahana front-end is a DIY (Do It Yourself) No-Code platform. It incorporates several billable applications and services such as web applications, REST (Representational State Transfer) API(s), databases, plug-ins, etc. To access and use Vahana incorporated applications and services, you need to become a registered user on Vahana. You can become a registered user on Vahana as follows:
Registering on Vahana Platform
To register on the Vahana platform, you need to visit the “Sign Up” page of the Vahana platform. On the “Sign Up” page, you need to provide the required information and then submit it. The Vahana cloud server receives the information and then sends a unique verification code.
After you enter the verification code, the server validates it and then performs the following functions:
- Automatically on-boards you on the Vahana cloud
- Creates a default workspace for you on the Vahana cloud
To register on the Vahana platform:
- Open the Internet browser (For example: – Google Chrome) on your computer system.
- In the Address box, enter the Vahana cloud’s URL.
- Press ENTER, and the Get Started with Vahana page opens.

- On the Get Started with Vahana page, in the Email address box, enter your email ID and then click Continue, and a group of boxes appears.
- In the group of boxes, enter values as follows:
| Box | Description |
| Full Name | In this box, enter your full name. The full name must includes your first name and the last name. |
| Create New Password | In this box, enter a new password that you will use as the password of the Vahana user account to access the Vahana portal. |

- After you enter your full name and the password, click Create an account, and the application displays the OTP box.
- The Vahana cloud server sends a unique verification code on your registered email ID.
Note:- Your registered email ID is the email ID that you enter in the Email address box.

- Access your registered email ID and then view the verification code.
- Enter the verification code in the box.
- After you enter the verification code, the application displays the “What brings you to Vahana” page.

- Click one or more tiles to create the type of application on the Vahana cloud.
- Click Continue, and the application creates a default workspace and then displays the message: “We have created your personalized workspace.“
- In the Name your workspace box, enter the name of your default workspace and then click Continue; you access your default workspace on the Vahana cloud.

Vahana Cloud Development Journey (An Interesting tale from being mere a mock up to a full-fledged Cloud Platform)
In the entire product development journey, the Vahana cloud’s development team has toiled hard to build the Vahana cloud as a robust and enterprise-class solution. It followed the best-suited agile-based incremental software development life cycle. While exploring best features for the Vahana cloud portal, the development team constantly penetrated the market place and attempted to know the current trends and customer demands.
This section will give a quick snapshot by comparing a section or screen with different looks and feels and a set of user interfaces. Thus, you can conclude how the product development efforts fine-tuned Vahana Cloud as a complete SaaS-based product.
Left Panel (Old Vs New)

Advantages of New Left Panel
- Responsive Panel expands after mouse hover action
- Does not require clicking arrow to expand the panel
- Contains icon and text-based menu options to switch to other features and portals.
On the Vahana portal, the left panel is a black color panel contains the following menu options:
- Vahana Home:- When you click this menu option, it takes you to the Vahana portal’s home page from the current page.
- Applications:- When you click this option, the Applications page opens and then displays all applications that you created under the current workspace.
- Vahana Academy:- When you click this option, the Vahana Academy Portal’s home page opens. Vahana Academy portal is a web-based portal that contains the technical and functional documentation on all Vahana Portal-incoporated modules. It contains documents under the following categories:
- Design
- Integration
- Deployment
- Monitoring
- Previous Version
- Vahana Community:- Vahana Community is a web-based collaborative platform that allows users to connect, share technical knowledge with each other. It provides the following core features:
- Expert Support
- Knowledge Sharing
- Regular Updates
- Pre-engagement initiatives and opportunities
- Support Portal:- The support portal is a web-based portal that a Vahana cloud user can access to create a ticket related to several purposes, such as IT support, software development, project management, and customer services. It provides the following core functionalities:
- Issue Tracking and Resolution
- Communication and Collaboration
- Prioritization and Resource Allocation
- Accountability and Documentation
- Analysis and Improvement
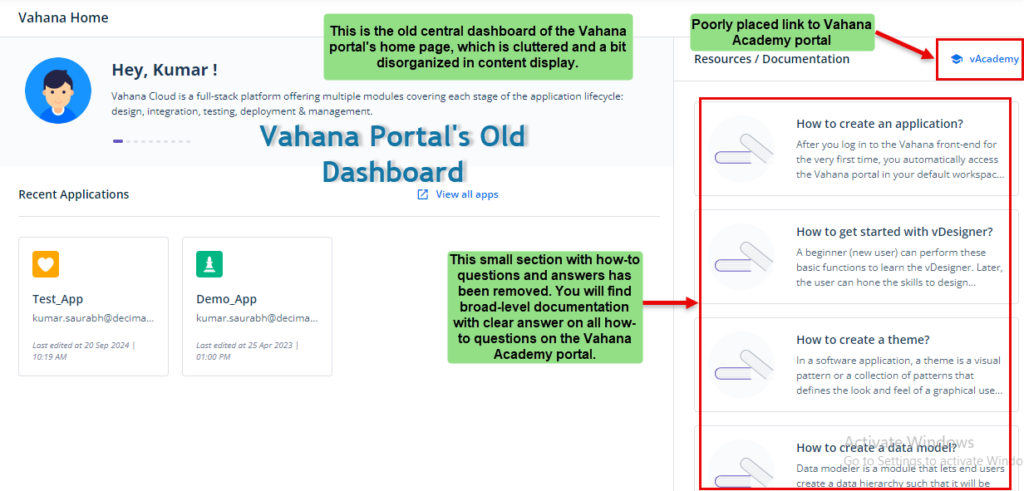
Central Panel (Old vs New)


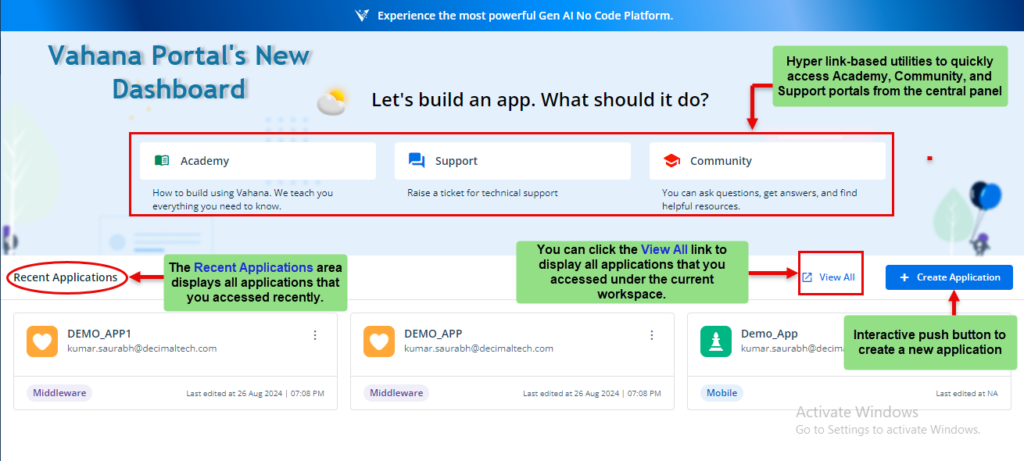
Advantages of New Central Panel
- Removal of unwanted section and content making space for more utility items
- Moving hyper-link based utilities to access Academy, Support, and Community portals from the top panel to the central panel
- Push Button Interface to create an application
- Attractive application theme containing appealing primary and secondary color
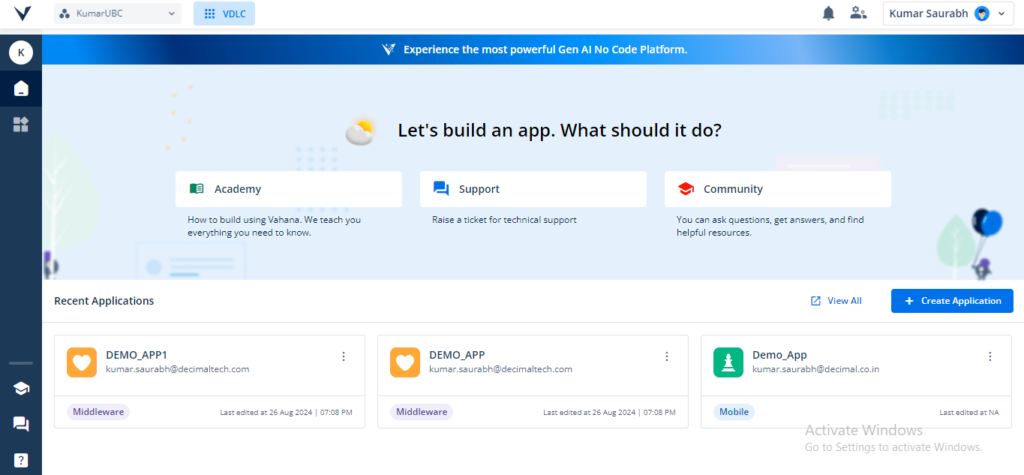
Vahana portal’s home page is a colorful middle panel that displays the following items:
- Hyperlink-based tiles to access the following:
- Vahana Academy Portal
- Support Portal
- Vahana Community Portal
- Recent Applications Area:- This section displays all application that you accessed recently and frquently
- View All link to display all applications that you can access under your current workspace
- Create Application link to create a new application
Top Panel (Old Vs New)


Advantages of New Top Panel
- Removal of small and not-so-clearly visible links to Vahana Academy and Community Portal
- Introducing a new VDLC push button to access important modules of the Vahana cloud through centralized context menu
- A “User” icon to access IAM and Account Management modules
The Vahana cloud’s home page’s top panel contains the following:
- <<Workspace Name>> List:- Click this list to switch from the current workspace to another workspace. After you click this list, it displays the list of different workspaces under the parent account.

- VDLC Icon:- The term VDLC stands for Vahana Development Life Cycle. When you click the VDLC icon (
 ), a panel expands and displays the following categories:
| Category | Avaiable Modules |
| Design and Architecture | In this category, you can access the Theme and Data Modeler modules. In the Theme module, you can apply a customized theme to the application. In the Data Modeler module, you can define a data model to manage and store a variety of data. |
| Development | In this category, you can access Native Mobile & Progressive Web Application and Web Application. When you click Native Mobile & Progressive Web Application, it allows you to create interactive mobile applications by using vDesigner module. When you click Web Application, it allows you to create robust enterprise-level web applications by using the vFlow module. |
| DevOps and Testing | This category allows you to access the Config Management module. By using the Config Management module, you can create a feature branch to modify the existing application code or write a new programming code, merge feature branch into master branch, compare two branches, and release an integration branch. To know more about the branching and Config Management module, visit the post: Branching. |
| Operations and Maintenance | In this category, you can access three sub-modules as follows: a. App Ops b. Observability c. Analytics You can access these sub-modules in the IT Ops module for the following purposes: i. AppOps:- You can use the App Ops module to monitor the vConnect services’ performance and forcefully kill the active user session. You can also create and manage users’ profiles so that they receive periodic alerts and messages. ii. Observability:- You can use the Observability sub-module to view developer and event logs, statuses of scheduled services, and others. iii Analytics:- The Analytics sub-module displays data related to services’ performance in graphical and tabular formats. |
- Notifications:- After you click the Notification icon (
 ), a panel expands and displays unread notifications. On the panel, you can click Go to Notification Center to access the Notification Center page. The Notification Center page displays a list of notifications category-wise.
 - User Group Icon (
 ):- After you click the user group icon (
 ), a menu expands and then displays the following:
- IAM:- After you click this menu item, it takes you to the IAM (Identity Access Management) module. It allows you to assign a role or a set of roles to the Vahana cloud user so that s/he can only access required resources to perform the intended functions.
- Account Management:- The Account Management module allows you to view and edit details of your account.
- <<Your Name with Icon>> (
 ):- On the top panel, this rectangular box displays your name and a down arrow. Your name specifies that you are logged in to the Vahana portal. When you click the down arrow, you can log out of the Vahana portal. When you click your name, the <<your name>> page opens with the following tabs:
| Tab | Description |
| Edit Profile | Under the Edit Profile tab, you can edit the following data: 1. Your full name 2. Your company’s name (Enter your current company’s name) 3. Your mobile number (When you enter a mobile number in the Mobile number box, it is treated as the registered mobile number on the Vahana cloud.) 4. Click the “Your Role in the company” list and then select a new role on which you perform responsibilities in the company. After you edit data in the profile, click Update Info to save new changes in the profile. |
| Change Password | Under this tab, you can change your current password. To change the current password: 1. In the Current Password box, enter the current password of your Vahana account. 2. In the New Password box, enter a new password that you want to use in place of the current password. 3. After you enter the new password, click Save Changes to replace the current password with the new password. |
| Security | Under this tab, you configure the application level securities. If the Vahana cloud finds the unusual pattern in activities by using your account, it asks you to pass security checks before you can perform the next function. You can configure the security checks as follows: 1. Verify Identity via SMS:- a. In this box, click Edit to enter a new mobile number in the Mobile Number box. b. After you enter a mobile number, click Send OTP to receive an OTP on the mobile number that you enter in the box. c. After you receive the OTP, enter the OTP in the OTP box. d. If the Vahana cloud authenticates the OTP, your mobile number is verified. If the Vahana cloud finds an unusual pattern in activities using your account the next time, it will validate your identity via OTP-based authentication. 2. Verify identity with security questions In this box, click Enable, and a set of three questions and answers comes into view. To define this security option, enter the question and then enter the question’s answer. If the Vahana cloud finds the unusual pattern in activities through your account, it will validate your identity by asking these questions. After you enter the correct answer, it will allow you to perform the next function. |
